
What puzzles are to be solved when designing the architecture of a TV app? What stack is good to use? In the last article of this series we’ll present approaches, tools, and frameworks for smart TV app development. We’ll also share 7 first hand tips that may come in handy.
How to develop apps for a smart TV while trying not to cry (3/3)

We’ve already presented how to design the UI for smart TV. The previous article tackled the navigation path and important features. Today, we’ll present the architecture of a smart TV app, builders, and possible issues you might encounter. We’ll also give you some useful tips that will make your developer’s life easier.
Part 3: Bits and pieces from smart TV app development
The Battle Plan
When you’ve got the controls figured out, it’s time to choose the technology you’ll use for the development.
What we knew beforehand:
- We’ll develop an app for Samsung (TizenTV) and LG (webOS) TVs. We have agreed with our client on the (development) SDK version 3.0 or latest for both platforms.
- We wanted to have a similar application core, reducing the platform specific code required to a minimum.
- We wanted the app to also function in a web-browser. Alternatively, we want the possibility for it to run as a desktop app encapsulated in the Electron container.
Both, TizenTV and LG, are based on the current web technologies, so all the possible targets and devices where the app should run are covered. We only have to choose the appropriate javascript stack and we can start the development. The client chose TizenTV as the main platform for the development. We estimated that we’ll need around 10-15% more time for the additional port and webOS adjustments
In the end, this approach has proven to be not suitable. Because we discovered that:
- Televisions, in general, have low computing power (several orders of magnitude below the computing power of mobile phones) but the LG TVs are slower than Samsung TVs (in the same price range).
- TizenTV runs on and supports Chrome/Chromium API version 47, webOS runs on Chrome 38.
- webOS does not support quite a few features that we would expect from today’s modern browsers. Chrome 38 was released in October 2014, Chrome 47 in December 2015, just to compare the two.
Therefore we selected a more complex platform on faster devices for the initial development, instead of starting from scratch on a slower device with a less complete API. In other words, in order to upgrade the features for faster TVs during the second development cycle, we had to downgrade and optimize the features for slower TVs.
Stack
Let’s now talk about the stack; its core ended up something like this:
- React for views
- React Router for navigation between screens
- MobX for data stores
- Webpack for development/build tasks
- Typescript, because it’s cool (and supports data types, Interface, compile time check and other features that make javascript more bearable in this millennium <3)
- SASS, because you just can’t go without it
- More honourable mentions:
- crypto-js for encryption
- pica for a nice looking <canvas> related outputs
- fetch polyfill, because we like this Promise-based API and we didn’t want to get rid of it just because the webOS 3.0 doesn’t support it yet
We chose React because most developers are familiar with it and we became used to it over the years. Personally, I still believe that the days of incredibly fast microapps based on jQuery are not over yet but here at eMan we regard React as the most suitable, clear, and well documented solution for single page apps at this moment.
We could spend countless hours talking about React’s performance optimization, but that’s not the purpose of this article. So we summed up the important bits:
- There is a huge difference between the production and development builds when developing for TVs. If you’re testing the development build and the app seems slow, there’s no reason to panic. The production build will probably work better.
- The less created React components are stored in the memory the better. On the other hand, the more they are created in the runtime the better. Using coding language, that means that you want to replace all calls for React.createElement() with a wrapper function that will decide on creating a component at a suitable time. It’s 2018 so everyone probably knows this but anyway, the Babel plugins transform-react-inline-elements and transform-react-constant-elements are a good place to start.
- Use the Web Worker API for calculations and let React work on the main thread in order for it to have the biggest capacity possible. But make sure to always verify on the TV if there is any actual impact on the performance.
- Don’t even bother with the hoisting component for reusability. There’s so little memory on the TV that it’ll only have a negative impact on the performance.
- We believe that in the web-world, if you don’t need some part of the script, it doesn’t need to be in the app and you can lazy-load it later. The complete opposite is true for TVs – if you need a script or a resource (not a React component!) later on, load it before you show the app to the users. The users are happy to sit through a longer loading time because they’re eager to work with the app. And you don’t want to disturb them with lags afterwards.
We became fans of the React-MobX combination when developing websites. React has a magical @observer decorator that’ll ensure that whenever some props the component observes are changed, MobX carries out a new render cycle of the given component automatically. So long componentWillReceiveProps(), see you shouldComponentUpdate(), we had good times together but it’s time to move on.
When we were deciding on the stack, the Redux enthusiasts reasoned that the action and reducers are more clear and that one always knows what went wrong. And while that’s true, the volume of boilerplate code that’s necessary to create even for a small data operation became quite unbearable to us over the last two years. MobX also has actions and when these are annotated, the MobX developer tools will show them easily and then the debugging is as comfortable as when using Redux.
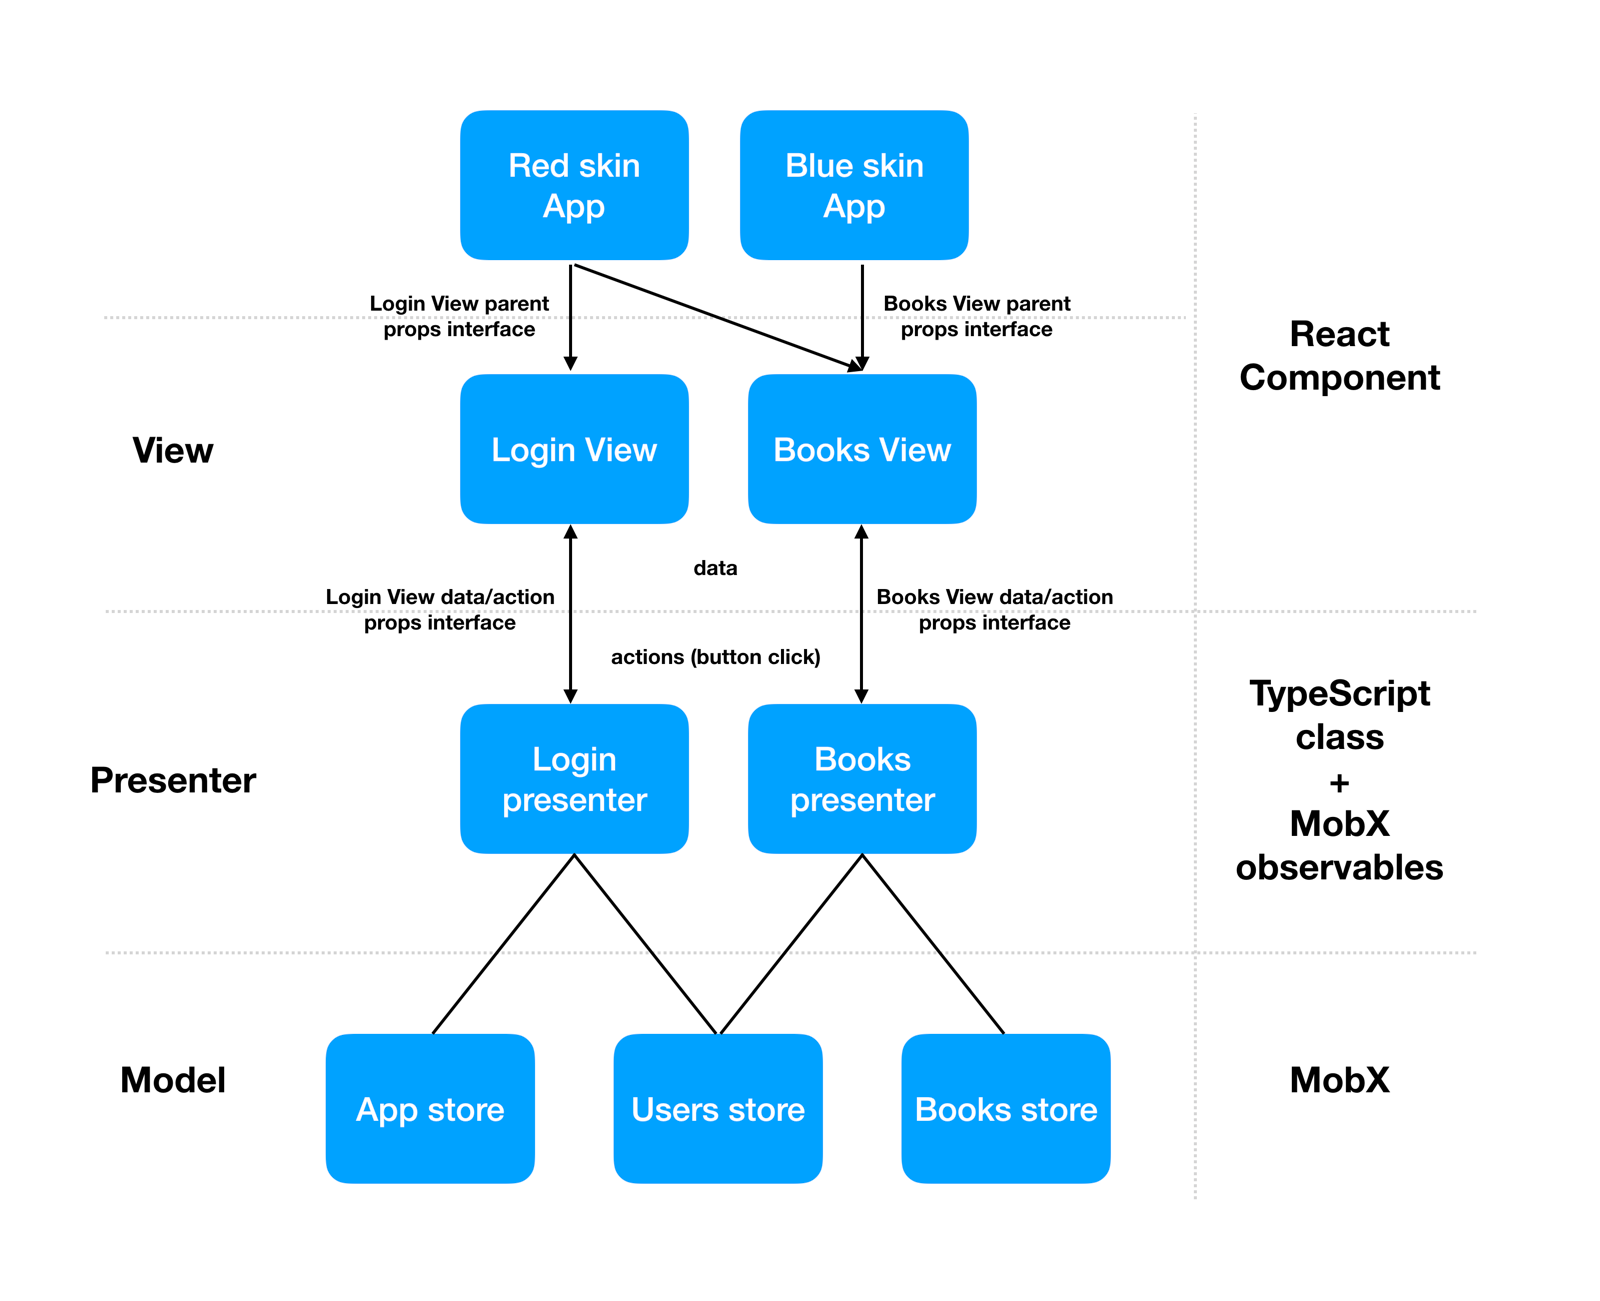
The MVP Architecture
We agreed that using React+MobX is truly awesome. We wanted to be even more awesome so we had to take one extra step and introduce a sufficient general architecture; this introduces a mediator between data and Views that strictly separates the two layers. Ideally, that’ll mean one screen = one compact encapsulated whole. Because as much as we like React and its view on data, combining it with MobX creates a very tight link with observables which is bothering us.
These are the main issues we have:
- React component knows that a certain MobX exists. Therefore we can’t use it again just out-of-the box in case we decide to switch MobX for Redux of Flux.
- React component knows the identity of a certain MobX store. That’s a huge issue if we want to test the component and send to it dummy props (e.g. as mock JSON objects). We have to create the corresponding MobX store in such case.
Therefore, the ideal solutions are:
- Dumb (ideally stateless, functional) components that display only data. Data origin must be unknown to the component, it only has to be able to display it. The component must not know the @observer, @observable, @computed, @inject or anything alike.
- MobX stores with their own data domains in clearly set semantics and with their own business logic that typically completes the data upon request.
- Mediators that will collect and group data from various stores, call store actions, and expose the @observable variables for views (whose identity they must not know).
We wanted to divide the props that can be accepted by the React component into two groups as a bonus:
- props incoming from the data source (let’s call these “bottom props”)
- props incoming from higher order components (“top props”)
… while the interaction of these categories should be known only to the object/component that can offer them. The data source (mediator connected to the MobX store) knows the props dealing with clear data and the parent React component that renders our child component does not have access to the information about the data. Usually only the info about the UI is sent to it, e.g. what colour the subcomponent should be.
The issue with identities is largely solved by the Typescript itself, you only need to use the Interfaces instead of real classes. We identified the mediator between the View (React component) and Model (MobX store) as a usual Presenter and therefore the whole pattern is a typical MVP.
Presenter is a vanilla javascript class that doesn’t know the identity of its View, but it can handle two-way communication:
- from/to MobX stores that requests data
- from/to View that it sends data to and reacts to its actions (a button press)
Put all together, ideally it should look something like this:
When we cleared up all these requests, the “only” thing remaining was to write the factors that’ll glue everything together and that’ll contain the most common logic possible for the entire MVP in one place:
import * as React from 'react';
import { observer } from 'mobx-react';
import stores from '../../stores';

function MVPFactory<Props, ParentProps>(View: React.ComponentClass<Props & ParentProps> | React.SFC<Props & ParentProps>, Presenter: new (stores: stores.IAppStores) => Props & mvp.IPresenter) {
 const ObserverView = observer<Props>(View);

 class MVPComponent extends React.Component<ParentProps> {
   private presenter: Props & mvp.IPresenter;

   constructor(props: ParentProps) {
     super(props);
     this.presenter = new Presenter(stores);
   }

   render() {
     const { props: parentProps, presenter: dataProps } = this;
     return <ObserverView {...parentProps} {...dataProps} />;
   }

   componentWillUnmount() {
     this.presenter.destruct();
   }
 }

 return observer(MVPComponent);
}

export default MVPFactory;
… and a typical calling in a module that we export as a “clean” React component:
import MVPFactory from '../mvp/mobx';
import Presenter from './Login.presenter.mobx';
import View from './Login.component';

export default MVPFactory<login.IProps, login.IParentProps>(View, Presenter);
Things we achieved:
- The Factory knows the identity of the stores and sends their instances to the presenter. It’s the only place where the identity of the data source is known.
- The external (main) component knows only the interface props that can be sent from the top (from the parent).
- The internal component knows all props that it can work with (parent props + props from the data source).
- The presenter exists as a private variable on the component and manages the delivery of all props to the component. The presenter’s identity is not known, its interface is. We only know that, as a constructor parameter, it accepts stores.
- We call destruct() on the presenter before the component is destroyed. The typical usage, in our case, is when we need to manually release strong references that are created as the autorun() effect of MboX call.
This mechanism allowed us to delegate specific tasks to specific classes and made the work with views and data clearer. Moreover, half of the team could deal with the implementation of Presenters and Models and only expose the Views interface, which was managed by the other half of the team.
7 tips for you after two months of development
- Download the TOP 10 apps for a given platform and observe what works and what doesn’t. Be inspired.
- Forget about emulators. Do your testing on a real device. Both TizenTV and webOS have remote debuggers, and you always see why the app crashes in the developer’s console. You don’t have to deal with the emulators’ lack of functions (and there’s quite a lot they lack).
- Do your testing with real users, the less technically skilled they are the better.
- If you’re using animations, forget about complicated calculations. WebWorker simulating the second thread helps sometimes but the help is only marginal because the CPUs used in TVs are usually single/dual core. Experiment, test its real impact on the performance.
- Try to avoid using <canvas>, if you can. If you have to use <canvas>, don’t use animations. If you have to use animations, give preference to CSS. TVs don’t have sufficient performance; while you can easily tweak the rendering of a graph at 60 fps on your desktop, it’ll be around 5-10 fps on the TV. On both platforms, <canvas> does not support the toBlob() method and its javascript polyfill is very expensive. If you are using canvas for expensive operations with images (combinations, cropping), save the resulting images to a window using URL.createObjectURL(). Use the pica library for a better output after resizing the images. The library supports various types of algorithms (bicubic etc.). Remember that you are developing for a 4K screen, every pixel makes a difference.
- If you’re dealing with cryptography, try using the WebCrypto API as much as possible. It binds to the system directly and all calculations are performed in C instead of javascript. webOS 3.0 doesn’t implement the API fully and it’s missing some algorithms (we, unsuccessfully, looked for PBKDF2). If you also didn’t find what you were looking for, you can always use a wonderful library called crypto-js, although it’s slower as it uses javascript for calculations.
- Have a lot of willpower and chocolate at hand!
And that’s our first TV adventure in a nutshell. We’ll leave the next steps in this messy, badly documented world up to you. 🙂 Should you need help while developing your apps for smart TVs or if you’d like to talk about this topic in more detail, stop by for a coffee at eMan, we’ll be glad to help.