
Language Dart you need to know if you want a Flutter flow. That’s why we’ll have a look at how to write and design in Flutter. We’ll answer the basic question: Why does it work cross-platform? And we’ll also call a native service for the given platform.
Let’s Develop a Mobile App in Flutter (2/3)

The last article presented the Flutter framework. We’ve set up the environment in order to be able to start developing the Flutter application and described the structure of the Flutter app project. We also presented how to create the platform-dependent dialogue.
Today, we’ll introduce Flutter in more technical details. We’ll go over the Dart language in order to understand how to actually write in Flutter. We’ll talk about Flutter from a design perspective and explain why it works cross-platform. And we’ll show how to call a native service for the given platform. Let’s get started.
Language class
Dart is an object-oriented programming language with syntax very similar to today’s modern languages such as Kotlin, C# or Java.
Variables
Dart is a strongly typed language. That means that every variable has its own data type that is determined when the variable is created and it cannot be changed when the program is running. You don’t have to explicitly state the data type when creating a new variable. You can use the keyword var to deduce its type. Even though it’s a strongly typed language, you can create a variable “without any data type” by using the keyword dynamic.
// explicit data type
String firstName = 'Eman';

// data type deduction
var surname = 'Novák';

// variable data type
dynamic company = 'eMan.cz';

//firstName = 10; // compile error
//surname = 10; // compile error
company = 10;
Classes and objects
Everything is an object in Dart. Every object is an instance of a class and all classes inherit from the Object class. The classes consist of class variables and methods (static methods); objects consist of instance variables and methods.
One of the concepts of object-oriented programming is the encapsulation of classes. In Java, for example, you can define several visibility levels, usually by using keywords such as private, protected, or public. Only the private and public visibility, that which is not defined by special keywords, exist in Dart. But while declaring a class, variable etc. for private visibility, it’s sufficient to use the _ prefix in the name of the element. The visibility does not apply to the classes’ level but to the level of the individual app parts – libraries (library).
class _MyPrivateClass {
  String _myPrivateVariable = '...' // private variable in private class
  String myPublicVariable = '...' // public variable in private class
}

class MyPublicClass {
  String _myPrivateVariable = '...' // private variable in public class
  String myPublicVariable = '...' // public variable in public class
}
Note: Each individual Dart file is a library by default. That means that the individual private components are not visible among the files.
An interesting concept of this language is the Named constructors. It’s a classic object constructor but you can define its name. If the constructor is named appropriately, you can deduce how the object is created from its name. In Java, for example, a similar construct could be created using a static method that would create and initialize the actual object.
class Person {
  String firstName;
  String surname;

  Person.fromJson(Map data) {
    firstName = data['first_name'];
    surname = data['surname'];
  }
}

main() {
  var person = new Person.fromJson({'first_name': 'Eman', 'surname': 'von Prag'});
  print(person.firstName); // Eman
  print(person.surname);   // von Prag
}
Functions
Dart also supports classical functions and because everything is an object, so are the functions. The main function is the main() function that is the app’s entry function, therefore every app will start with this function. You can nest the definitions of the individual functions and create, so called, Nested functions. Every nested function gains the context of the function in which it’s nested, it can see its local variables.
bool topLevel = true;

void main() {
  var insideMain = true;

  void nestedFunction() {
    var insideNestedFunction = true;

    void nestednestedFunction() {
      var insideNestedNestedFunction = true;

      assert(topLevel);
      assert(insideMain);
      assert(insideNestedFunction);
      assert(insideNestedNestedFunction);
    }

    //assert(insideNestedNestedFunction) translation error - unknown variable
  }
}
Null-aware operators
Similarly to Kotlin, Dart offers several operators that make notation of the Null Pointer safety code easier.
- If null operator –
expr1 ?? expr2– if the expressionexpr1does not equal null, the whole expression is evaluated asexpr1, if it does it’s evaluated asexpr2 - Null-aware assignment –
variable ??= expr– if the value of thevariableequals null, the expressionexpris assigned to the variable. - Null-aware access –
variable?.method– if the value of thevariabledoes not equal null, themethodmethod is called and the call result is returned, otherwise null is returned.
Cascade
The cascade is for calling multiple methods on a single object. In Kotlin, a similar result is obtained by using the apply.
class Person {
  String firstName;
  String surname;
  String company;
}

main() {
  var person = new Person()
    ..firstName = 'Bob'
    ..surname = 'Clever'
    ..company = 'eMan.cz';
}
Everything is a widget
You’ve probably heard that “everything is a widget” if you’ve read any article about Flutter. And yes, everything is actually a widget. Everything, even the app itself, is a widget. Thanks to this, every UI element can be addressed uniformly. There are two kinds of widgets:
- Stateless widget – elements that represent the stateless widget have no internal state to manage (are unchanging). The state of the element is set upon its construction and cannot be changed during the lifecycle of the object (all attributes of the class are final).
- Stateful widget – elements that can and do change their internal states. The stateful widgets consists of two parts:
- a part that defines the widget and remains unchanged
- a part that defines the widget’s state, can be changed and keeps the widget’s state
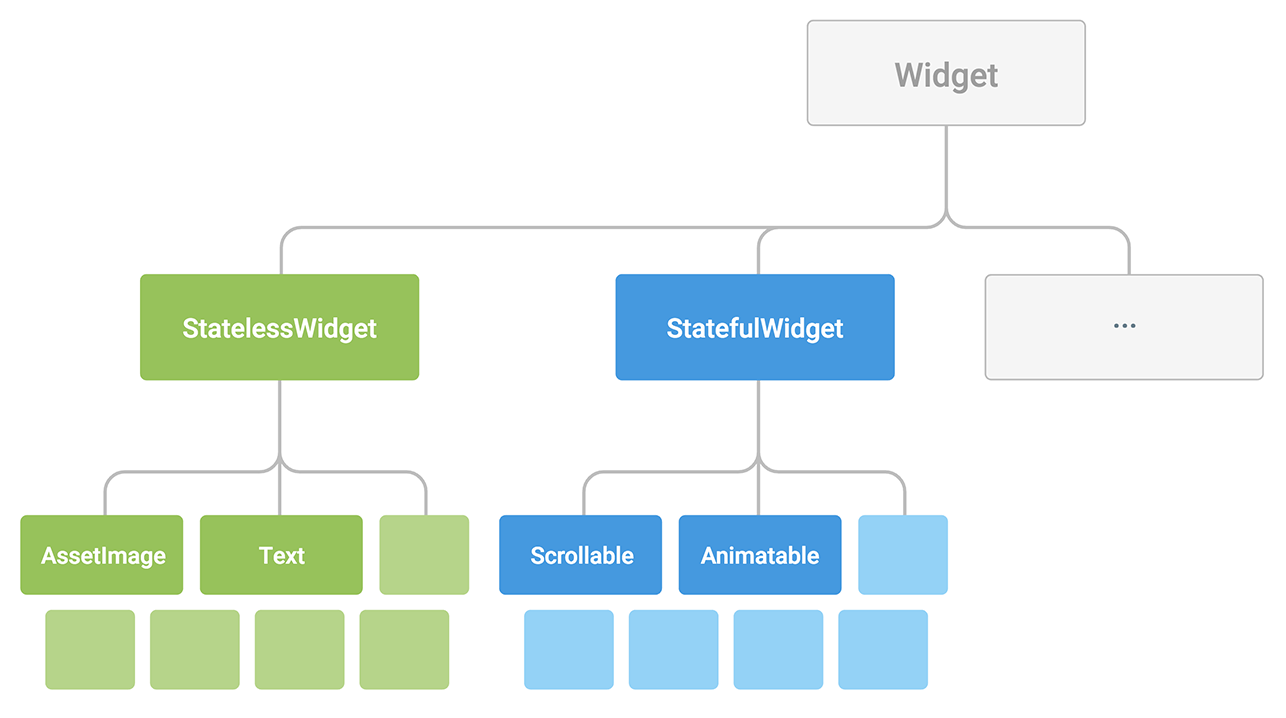
Every widget is very small because it manages only the activity it was created for and not any other. For example, the Text widget that displays text manages only the actual display of the text and doesn’t consider its position in connection to the other widgets nor has the ability to gather events (e.g. clicks). If you want it to have any other function, you simply add another widget that supports the function you need. In the end, developing a Flutter app results in putting the individual widgets together in order to get the desired functionality, which reminds us of building with Legos. And everyone loves Legos, right?! 😉
Flutter technology
Flutter does not use any native elements of the target platform. All elements were developed anew by Flutter developers in order to be suitable to the conventions of the target platform. Most of the app’s source code is translated directly into machine code of the target processor (via Android NDK on Android and via LLVM on iOS). That’s why you only need one source code for both platforms. And thanks to this the resulting app performance should be way faster, at least on Android.
You can see the individual framework layers on the diagram below. The dependency of the individual layers is from the top down; each layer depends on the layers below. The green part shows the main components of the Flutter framework. As you can see, Material (Android) and Cupertino (iOS) components are on the same level, making the platform-dependent development quite complicated as we saw in the last article. When looking over the Flutter documentation on its website, you can find a diagram showing the Material component to be dependent on Cupertino. That would solve the above mentioned issue. Unfortunately, when looking into the current source code of Flutter, it seems that the two components are at the same level.
The blue part shows components present in the Flutter core that are responsible for the actual operation of the app. The Skia component is responsible for the rendering of 2D graphics, Dart for compilation of the AOT parts of the code that couldn’t be compiled into the machine code directly, and the Text component manages the rendering of the text.
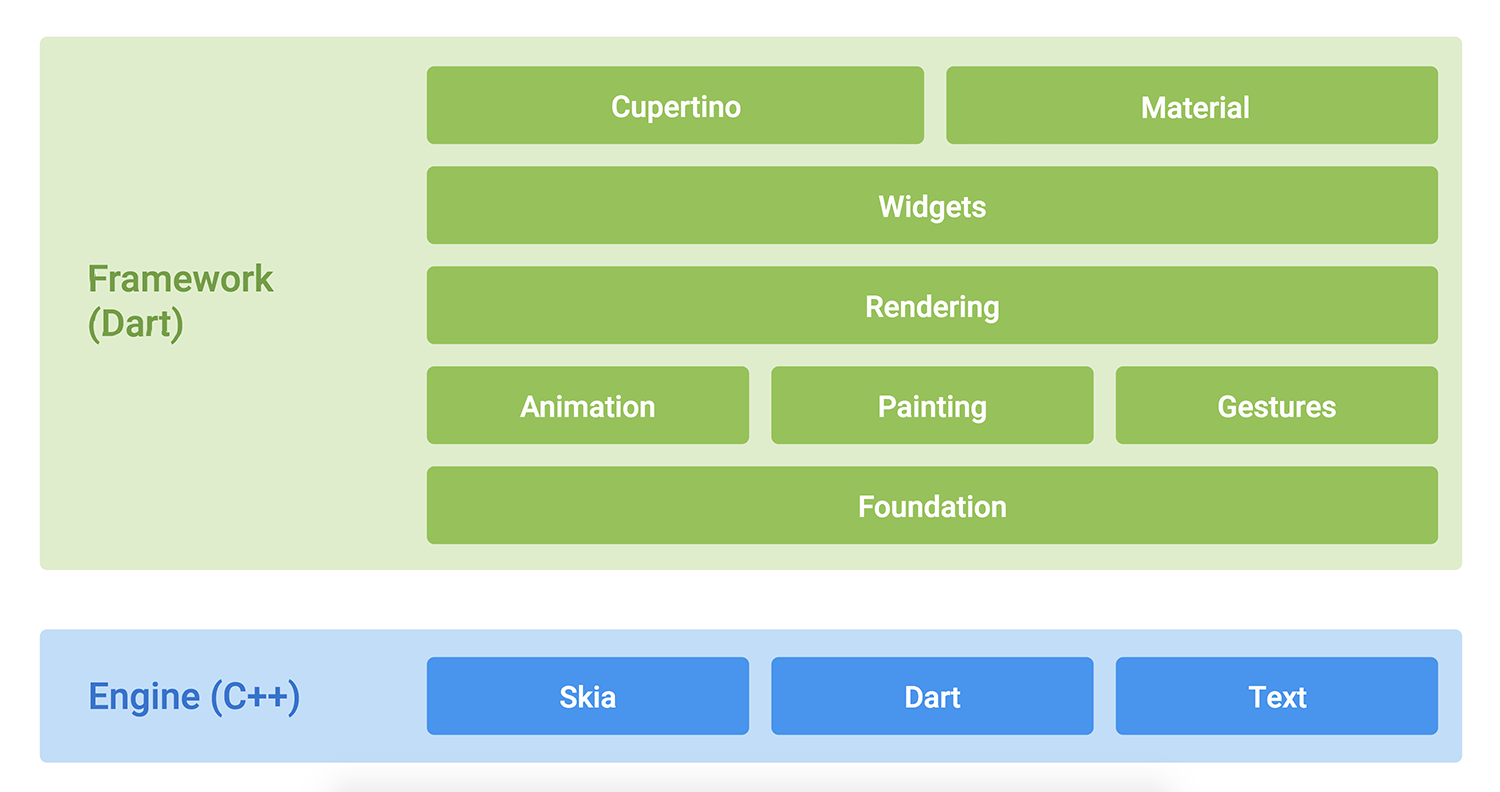
Edited from source: https://flutter.io/technical-overview/
Native interface
Flutter allows for calling a specific method of the native interface of the given platform using the, so called, Method channel. The Flutter app (client) sends a message with the request to the native part of the app (host). If the host knows the message, it manages the request and returns an answer. For this to be correctly served, both the client and the host have to implement the same message protocol.
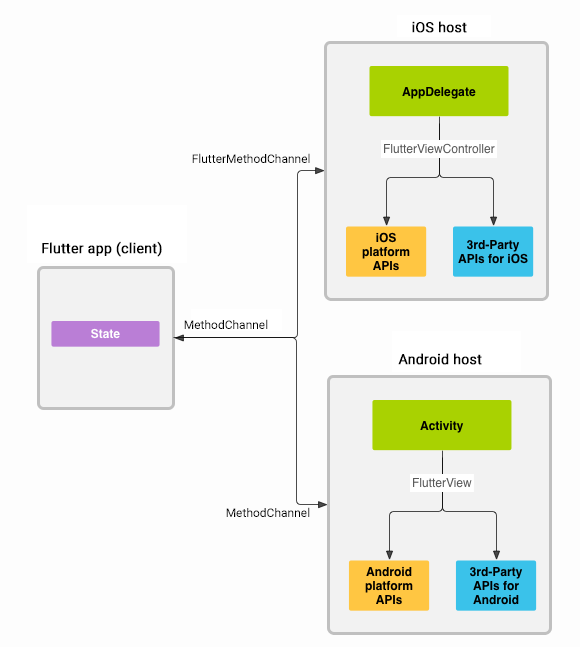
As you can see from the diagram, using Method channel you can call any service of the native platform or a service that is offered by third party libraries. It’s also one of the ways to implement a service using the platform-specific services that Flutter doesn’t support. This is useful when, for example, you don’t have a library with the requested service available for Flutter but it exists as a library for Android and iOS.
Let’s see this in action using an example scenario when you want to find out the battery status of your device. As Flutter supports the creation of the platform-specific parts of the source code even in Kotlin for Android parts, and in Swift for iOS parts, we used these languages for our examples.
Client
The client sends a request about the battery status and displays the formatted result in the middle of the screen upon its reception. The message processing is asynchronous so the state of the battery can be displayed only after the result is received. In the example you can see one of the possible methods of processing such asynchronous calls.
An important part is the construction of the MethodChannel object that awaits in the parameter of the constructor for the name of the channel that is being created. On the host side, you can connect the host and the client using the this name. In order for the client and host to communicate, they need to use the same channel as well as send and expect to receive messages of the same type. The invokeMethod() method is used for defining the message type (in the parameter of the method).
The main.dart file in the lib directory should then look like this:
const platform = const MethodChannel('battery');

void main() {
  platform
      .invokeMethod('getBatteryLevel') // sends message with request 'getBatteryLevel'
      .then((result) => 'Battery level at $result %.')
      .catchError((error) => "Failed to get battery level: '${error.message}'.")
      .then((msg) => runApp(new Center(
            child: new Text(
              msg,
              textDirection: TextDirection.ltr,
            ),
          )));
}
Host
It is important that the host registers the handler on the same channel that was defined on the client’s side. After receiving a specific message type, that can be determined by call.method, you can perform the requested operation and save the result in the result object.
The MainActivy.kt file in the android/app/src/main/kotlin/package_name directory should then look like this:
class MainActivity : FlutterActivity() {
    private val CHANNEL = "battery"

    override fun onCreate(savedInstanceState: Bundle?) {
        super.onCreate(savedInstanceState)
        GeneratedPluginRegistrant.registerWith(this)

        MethodChannel(flutterView, CHANNEL).setMethodCallHandler { call, result ->
            if (call.method == "getBatteryLevel") {
                val batteryLevel = getBatteryLevel()

                if (batteryLevel != -1) {
                    result.success(batteryLevel)
                } else {
                    result.error("UNAVAILABLE", "Battery level not available.", null)
                }
            } else {
                result.notImplemented()
            }
        }
    }

    private fun getBatteryLevel(): Int {
        return if (Build.VERSION.SDK_INT >= Build.VERSION_CODES.LOLLIPOP) {
            val batteryManager = getSystemService(Context.BATTERY_SERVICE) as BatteryManager
            batteryManager.getIntProperty(BatteryManager.BATTERY_PROPERTY_CAPACITY)
        } else {
            val intent = ContextWrapper(applicationContext).registerReceiver(null, IntentFilter(Intent.ACTION_BATTERY_CHANGED))
            intent!!.getIntExtra(BatteryManager.EXTRA_LEVEL, -1) * 100 / intent.getIntExtra(BatteryManager.EXTRA_SCALE, -1)
        }
    }
}
The AppDelegate.swift file in the ios/Runner directory should then look like this:
@UIApplicationMain
@objc class AppDelegate: FlutterAppDelegate {
    override func application(_ application: UIApplication, didFinishLaunchingWithOptions launchOptions: [UIApplicationLaunchOptionsKey: Any]?) -> Bool {
        GeneratedPluginRegistrant.register(with: self);

        let controller : FlutterViewController = window?.rootViewController as! FlutterViewController;
        let batteryChannel = FlutterMethodChannel.init(name: "battery", binaryMessenger: controller);
        batteryChannel.setMethodCallHandler({(call: FlutterMethodCall, result: FlutterResult) -> Void in
            if (call.method == "getBatteryLevel") {
                let batteryLevel : Int = self.getBatteryLevel();
                if(batteryLevel != -1) {
                    result(batteryLevel);
                } else {
                    result(FlutterError.init(code: "UNAVAILABLE", message: "Battery info unavailable", details: nil));
                }
            } else {
                result(FlutterMethodNotImplemented);
            }
        });

        return super.application(application, didFinishLaunchingWithOptions: launchOptions);
    }

    private func getBatteryLevel() -> Int {
        let device = UIDevice.current;
        device.isBatteryMonitoringEnabled = true;
        if (device.batteryState == UIDeviceBatteryState.unknown) {
            return -1;
        } else {
            return Int(device.batteryLevel * 100);
        }
    }
}
Conclusion
Today we discussed what to use and how to write when designing apps in Flutter. We presented the individual parts of the app and the individual parts of the Flutter framework. And we also tackled the communication with the native platform interface when calling platform-specific services. You can find the whole project at eMan’s GitHub.
Next time we’ll finally start developing a larger app. There you’ll be able to put all the knowledge gained throughout this, hopefully interesting, introduction to Flutter to good use.