
In this and future posts, I will be giving you a quick introduction to the Kotlin Anko DSL library. Anko is a library that Kotlin uses and provides a lot of extension functions to make our Android development easier. You will learn how you can define the UI in the code (by using Kotlin DSL) instead of writing it in XML. The Anko library is not only about UI definition, but it contains a lot of extension functions which can make your life easier during Android development.
Kotlin – Introduction to Anko for Android (1/4)

Because Anko is still in the process of being developed and the UI definition in the code is not yet ready for production, we at eMan are using only extension functions and utilities from the Anko library, but I think it is interesting to learn what Anko can offer to all of us.
verticalLayout {
      padding = dip(30)
      val usernameEditText = editText {
        id = R.id.userNameEditText
        hintResource = R.string.create_user_hint_username
        textSize = 24f
      }
}
List of all parts of the serie:
1. Setting up the Android Studio, project and creating your first view in Anko
2. Buttons, Toasts, Alert Dialogs, Intents, UI & Background Threads
3. View Enhancements
4. Fragments & RecyclerView
1. Setting up the Android Studio, project and creating your first view in Anko
In part 1, you will learn how to create a new Android project with Kotlin step-by-step, how to configure Gradle files to work with Kotlin, and finally you will create your first basic view (Sign In) in Anko DSL library.
Note: We will add more logic to our Sign In function in part 2.
Import project from GitHub
A project which will be created by this series of posts can be cloned from the GitHub repository or you can follow posts to create a complete project step-by-step.
Branches:
- master -> complete project from parts 1–4 (comple*(complete/complex?) code will be available after all parts are published)
- part 1, part 2, part 3, part 4
Setting up Android project with Kotlin and Anko
For this post I’m using the Android Studio 3.0 (beta2 – at time of writing). The Kotlin plugin is part of the Android Studio 3.0 so you do not need to do anything there, but if you are using a lower version of the AS you need to install the Kotlin plugin first. Go to Preferences -> Plugins -> Browse repositories and search for Kotlin:
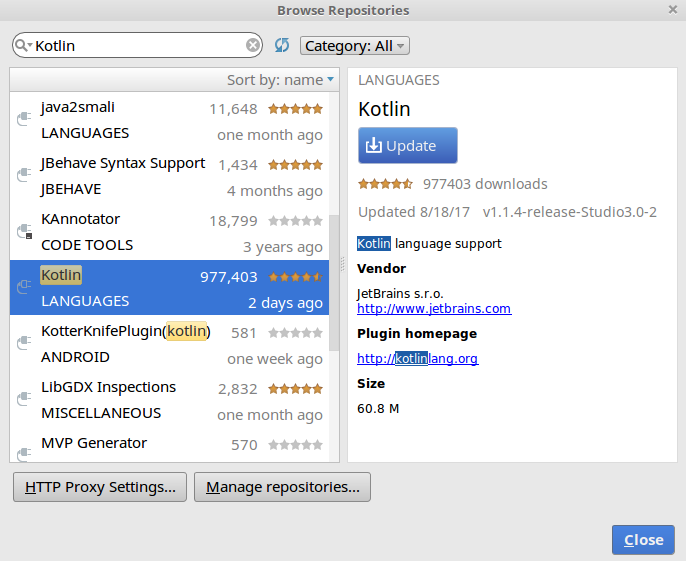
Now Android Studio is ready to have fun with Kotlin 🙂 But I really recommend using Android Studio 3 while reading this post series about the Anko library.
Let’s start with creating a new project:
Start a new Android project from a dialog or from the menu File -> New -> New Project (depends if you are inside of another project or in a dialog which Intellij shows if you are not inside of a project).
Now you will be asked for a name, domain, and package. You can write whatever you want or just write what I used. Leave Include Kotlin support at the bottom.
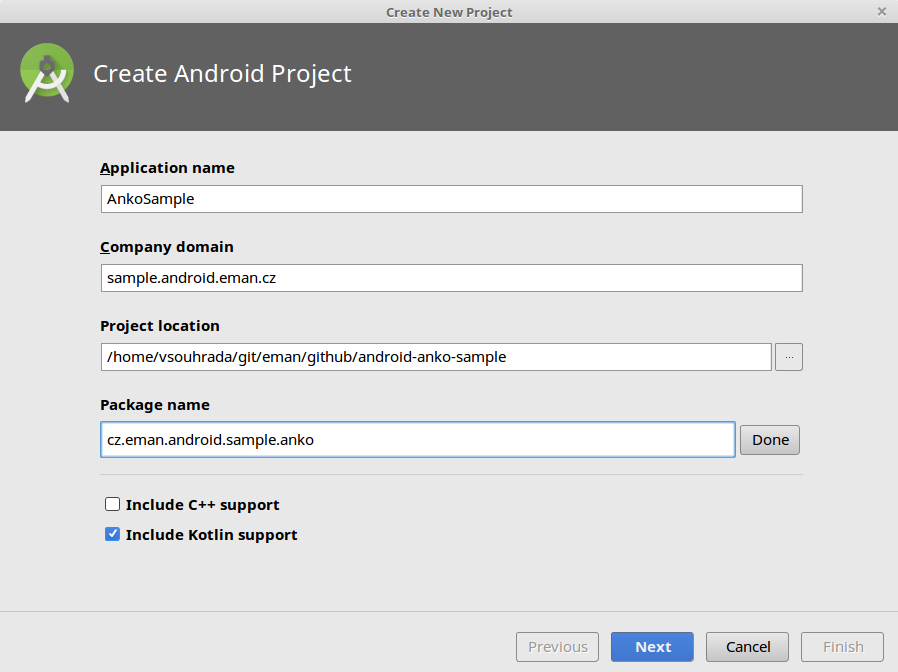
If you want to edit a package name you can click on the edit button on the right side and change it manually like I did.
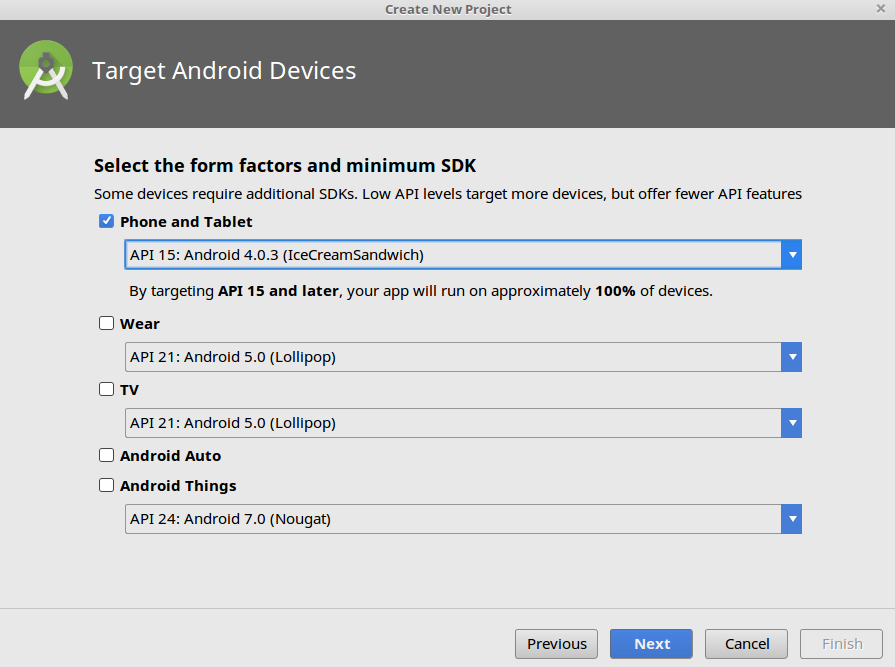
Now you will be asked to select a version of Android API to target more devices, so we will select API 15.
Now you can select an empty Activity. Name it whatever you want but I will leave the MainActivity name there.
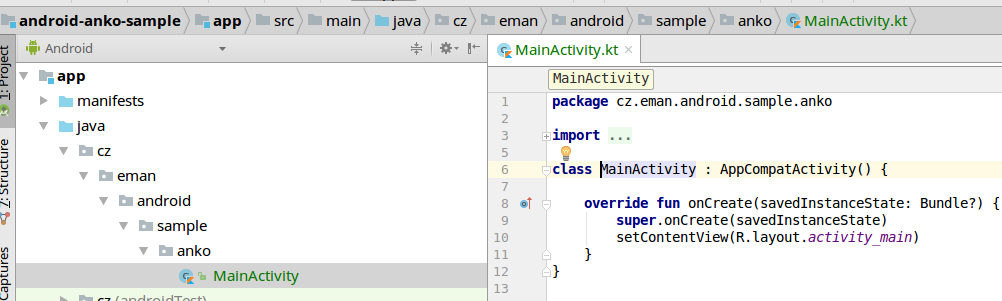
After these steps, a new project structure of our Android app should be created. The MainActivity class should be Kotlin class.
Configure Gradle
In this section, I will show you how you can integrate Anko into your Android project (created in the AS 3) and how you can have a better definition of dependencies in the Gradle files. First, we will describe the root build.gradle.
// Top-level build file where you can add configuration options common to all sub-projects/modules.

buildscript {
    ext.kotlin_version = '1.1.4'
    repositories {
        google()
        jcenter()
    }
    dependencies {
        classpath 'com.android.tools.build:gradle:3.0.0-beta2'
        classpath "org.jetbrains.kotlin:kotlin-gradle-plugin:$kotlin_version"

        // NOTE: Do not place your application dependencies here; they belong
        // in the individual module build.gradle files
    }
}

allprojects {
    repositories {
        google()
        jcenter()
    }
}

task clean(type: Delete) {
    delete rootProject.buildDir
}
You can see that the Kotlin plugin added definition to the ext. part for which version of Kotlin we are using and 1.1.4 + added kotlin-gradle-plugin on the classpath.
Next check the build.gradle file inside of the app module:
apply plugin: 'com.android.application'

apply plugin: 'kotlin-android'

apply plugin: 'kotlin-android-extensions'

android {
    compileSdkVersion 26
    buildToolsVersion "26.0.1"
    defaultConfig {
        applicationId "cz.eman.android.sample.anko"
        minSdkVersion 15
        targetSdkVersion 26
        versionCode 1
        versionName "1.0"
        testInstrumentationRunner "android.support.test.runner.AndroidJUnitRunner"
    }
    buildTypes {
        release {
            minifyEnabled false
            proguardFiles getDefaultProguardFile('proguard-android.txt'), 'proguard-rules.pro'
        }
    }
}

dependencies {
    implementation fileTree(dir: 'libs', include: ['*.jar'])

    implementation"org.jetbrains.kotlin:kotlin-stdlib-jre7:$kotlin_version"

    implementation 'com.android.support:appcompat-v7:26.0.1'
    implementation 'com.android.support.constraint:constraint-layout:1.0.2'

    testImplementation 'junit:junit:4.12'

    androidTestImplementation 'com.android.support.test:runner:1.0.0'
    androidTestImplementation 'com.android.support.test.espresso:espresso-core:3.0.0'
}
See lines no. 3 and no. 5 where the gradle kotlin-android and kotlin-android-extensions plugins are applied. The dependency on a standard Kotlin library is added on the line no. 29. This library includes a definition of Java SDK, meaning jre7 or jre8. The JDK definition was implemented into the Kotlin since its 1.1 version.
In the next step, we will improve our Gradle files s little bit.
It could be nice to move all versions of dependencies to the extension DSL block in a root gradle file like the AS Kotlin plugin did for Kotlin. I personally prefer the definition of dependencies in a separate gradle file. So it is up to you what you choose. I will define all dependencies in the dependencies.gradle file.
- Add a versions of dependencies to separate arrays such as:
- gradlePlugins – contains gradle plugins which will be added to classpath
- supportDependencies – support libraries
- kotlinDependencies – all Kotlin libs
- testDependencies – all tests libs
- Add a version of Anko 0.9.1 (there is already the Anko 10.1 at the time of this posting, but we’re using version 0.9.1 in the production so I decided to use it also for this post)
- Java 8 – with AS 3.0 we’re using Java 8 so we defined:
sourceCompatibility: JavaVersion.VERSION_1_8targetCompatibility: JavaVersion.VERSION_1_8
- Kotlin Standard Library with jre8:
org.jetbrains.kotlin:kotlin-stdlib-jre8
Your final dependencies.gradle file should look like this:
ext {

    //Versions
    versions = [
            appVersion         : '1.0.0',
            code               : 1,

            buildTools         : "27.0.2",
            compileSdk         : 26,
            minSdk             : 15,
            targetSdkVersion   : 26,
            sourceCompatibility: JavaVersion.VERSION_1_8,
            targetCompatibility: JavaVersion.VERSION_1_8,
            encoding           : "UTF-8",

            gradleBuildTools   : '3.0.1',
            gradle             : '4.1',

            kotlin             : '1.2.30',
            supportLib         : '27.0.2',
            constraintLayout   : '1.0.2',
            anko               : '0.9.1',

            espresso           : '3.0.0',
            junit              : '4.12',
            testRunner         : '1.0.0'
    ]

    // constants
    testInstrumentationRunner = "android.support.test.runner.AndroidJUnitRunner"

    gradlePlugins = [
            android: "com.android.tools.build:gradle:${versions.gradleBuildTools}",
            kotlin : "org.jetbrains.kotlin:kotlin-gradle-plugin:${versions.kotlin}"
    ]

    //Support Libraries dependencies
    supportDependencies = [
            appCompat      : "com.android.support:appcompat-v7:${versions.supportLib}",
            constrainLayout: "com.android.support.constraint:constraint-layout:${versions.constraintLayout}"
    ]

    kotlinDependencies = [
            kotlinStbLib: "org.jetbrains.kotlin:kotlin-stdlib-jre8:${versions.kotlin}",
            ankoSdk15   : "org.jetbrains.anko:anko-sdk15:${versions.anko}"
    ]

    testDependencies = [
            junit       : "junit:junit:${versions.junit}",
            espressoCore: "com.android.support.test.espresso:espresso-core:${versions.espresso}",
            testRunner  : "com.android.support.test:runner:${versions.testRunner}"
    ]

}
Now let’s see the root build.gradle:
// Top-level build file where you can add configuration options common to all sub-projects/modules.

apply from: 'dependencies.gradle'

buildscript {
    // Load dependencies - Gradle cannot handle with external properties inside of buildscript
    // So we need to apply external file here again
    apply from: 'dependencies.gradle'

    repositories {
        jcenter()
        maven {
            url 'https://maven.google.com'
        }
    }
    dependencies {
        classpath gradlePlugins.android

        // Kotlin Grade plugin
        classpath gradlePlugins.kotlin

        // NOTE: Do not place your application dependencies here; they belong
        // in the individual module build.gradle files
    }
}


allprojects {
    repositories {
        jcenter()
        maven {
            url 'https://maven.google.com'
        }
    }
}

task wrapper(type: Wrapper) {
    gradleVersion = versions.gradle
}

task clean(type: Delete) {
    delete rootProject.buildDir
}
And build.gradle in the :app module:
apply plugin: 'com.android.application'

apply plugin: 'kotlin-android'

apply plugin: 'kotlin-android-extensions'

android {
    compileSdkVersion versions.compileSdk
    buildToolsVersion versions.buildTools

    defaultConfig {
        applicationId "cz.eman.android.sample.anko"
        minSdkVersion versions.minSdk
        targetSdkVersion versions.targetSdk
        versionCode versions.code
        versionName versions.appVersion
        testInstrumentationRunner rootProject.ext.testInstrumentationRunner
    }
    buildTypes {
        release {
            minifyEnabled false
            proguardFiles getDefaultProguardFile('proguard-android.txt'), 'proguard-rules.pro'
        }
    }

    compileOptions {
        sourceCompatibility versions.sourceCompatibility
        targetCompatibility versions.targetCompatibility
    }

    sourceSets {
        main.java.srcDirs += 'src/main/kotlin'
        test.java.srcDirs += 'src/test/kotlin'
    }
}

dependencies {
    implementation fileTree(dir: 'libs', include: ['*.jar'])

    // Kotlin
    implementation kotlinDependencies.kotlinStbLib
    implementation kotlinDependencies.ankoSdk15

    // Support Libraries
    implementation supportDependencies.appCompat
    implementation supportDependencies.constrainLayout

    // Tests
    testCompile testDependencies.junit

    androidTestImplementation testDependencies.testRunner
    androidTestImplementation(testDependencies.espressoCore) {
        exclude module: 'support-annotations'
    }
}
At the root of the Gradle file, we inserted a link to our dependencies.gradle file into the line no. 3, which must be re-inserted again into the buildscript{} block. That is because Gradle is not able to work with external properties within this block. We also added a link to the Google Maven repository and we added Gradle Plugins to the classpath into the dependencies{} block.
You may notice that we have added several dependencies on the Anko library implementation kotlinDependencies.ankoSdk15 in app/build.gradle. SDK 15 indicates that we want to use Anko with support for the minimal version of Android API 15, which corresponds to our definition of minSdkVersion = 15.
You can see that we added a few Anko libraries. Anko consists of small libraries, which is great because you do not need to include a whole library if you only need some piece of code. For instance, if you want to use Anko’s library only for your work with the RecyclerView, you can just include: org.jetbrains.anko:anko-recyclerview-v7. Next, what you need to do is add reference on a main library based on minSdkVersion of your project.
On the other hand, if you do not want to use DSL features which Anko provides you can just add org.jetbrains.anko:anko-common.
For more info about available libraries and which you’ll need to use, see an official description.
After these steps, our project is ready to add some Kotlin code and finally to see how Anko is working and what it can offer us.
Kotlin as a source folder
This step is optional. If you want to keep Java as a source folder you can skip this step.
Note: If you follow steps below, you will still see the java folder as a source in the Android Project View because Android Studio merges all java sources to the java folder.
Rename the java folder src to kotlin (an optional step).
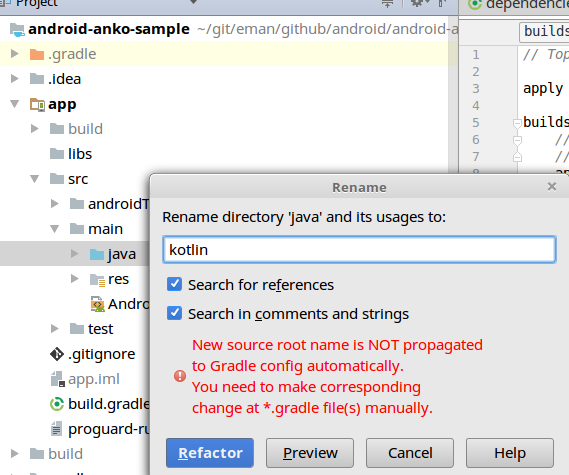
Now we must add the sourceSets dsl block to our app/build.gradle:
Android {
  ...

   SourceSets {
    	Main.java.srcDirs + = 'src / main / kotlin'
    	Test.java.srcDirs + = 'src / test / kotlin'
	}}
}}
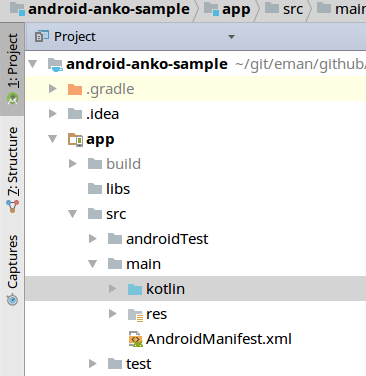
Now, look at your project structure.
In the Android Project View we still have java as a source folder:
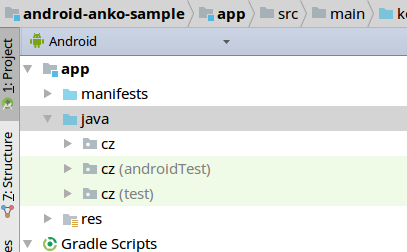
Switch to Project View and now you can see that we have a kotlin source folder:
The issue is reported there.
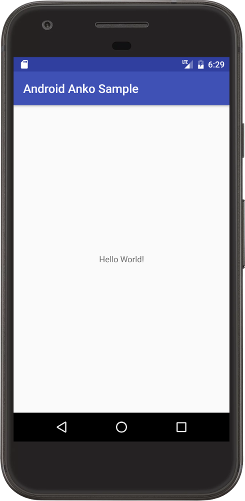
Now try running the application just to be sure that everything is working:
Creating your first view with Anko
Take a look at activity_main.xml. You can see that generated view has a root layout android.support.constraint.ConstraintLayout.
Anko is a very powerful library but it is still under development and needs time to add new features, so it’s to be expected that you will also find bugs or missing parts in this library which you’ll want to use.
One of the missing features is support for Constraint Layout.
We can solve this by mixing the Anko view definition together with XML – but the goal of this post is not to see how to create a view in code by using Anko DSL. I will discuss that later on in this topic. But rather because of this limitation, we will use LinearLayout. You can now remove the Constraint Layout dependency from a project (dependencies.gradle, app/build.gradle).
We will create an application with 2 views:
- Sign In
- Say Hello to signed user
Sign In functionality
In this process, we will create the Sign In view with these widgets:
- Username (frosty)
- Password (snowman)
- Sign In button
Username and password will be predefined (we do not have a registration process).
Sign In Activity
To have a nice project structure I created a new package called sign_in. Now it’s time to create a new Activity (do not forget to create it in Kotlin).
Click on sign_in package and select:
New -> Kotlin File / Class
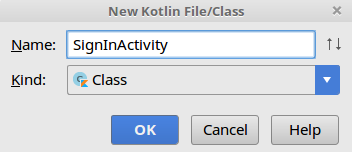
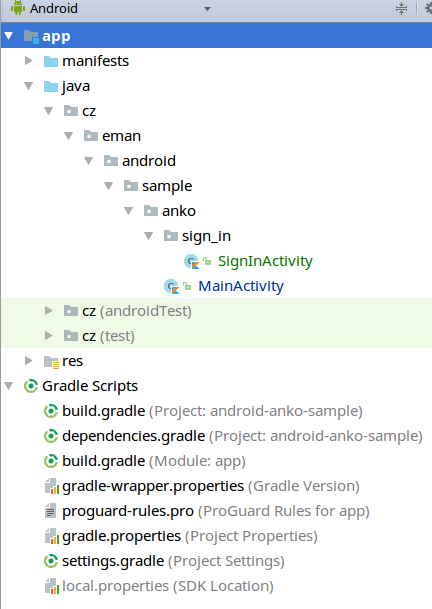
Your project structure should now be:
Anko Component
We can use Anko DSL directly inside of our Activity class but conveniently have UI in the separate class called Component. It allows for easy re-use and your code in your activity or fragment will be cleaner.
Now it’s time to create our first view inside of the component and then set up our SignInActivity to create a view from our component. We will name it SignInView.
class SingInView : AnkoComponent<SignInActivity> {

  override fun createView(ui: AnkoContext<SignInActivity>): View {
    TODO("not implemented") //To change body of created functions use File | Settings | File Templates.
  }

}
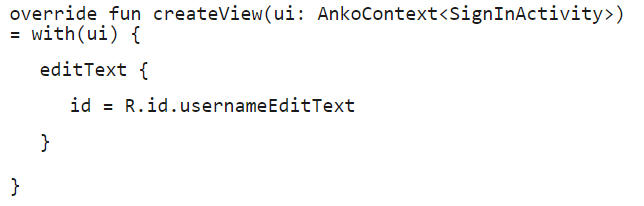
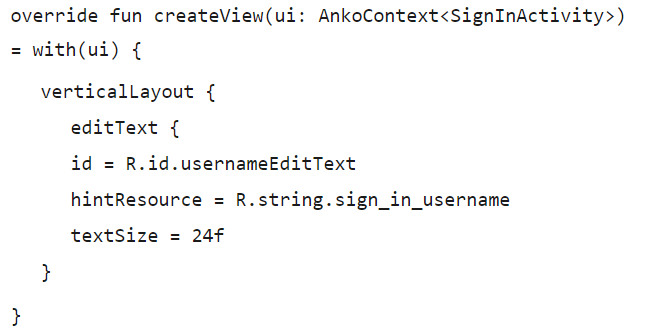
Add editText{} DSL block. Inside of this block we now have access to all attributes like we have in XML and of course to all methods which we can use from a code. First we will set a unique id to our editText widget.
We need to create ids.xml file and define id(s) for our Anko widgets before we can use it in the code.
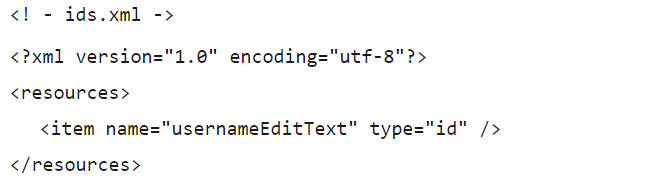
Now we can finally define id = R.id.username to our editText.
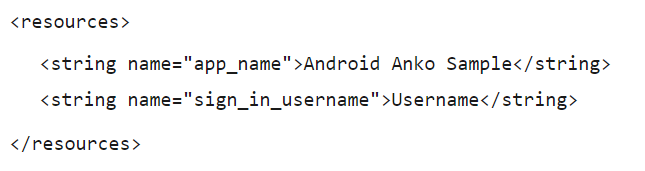
Next add hintResource and textSize = 24f: strings.xml.
Your code should look like this:

Note: If you want to (for whatever reason) use text directly instead of reference to strings.xml so you can use hint property in the editText.
A code which we have written looks very nice and clean, don’t you think? BUT something is still missing… As I already mentioned we will use the LinearLayout so our next goal is to wrap username to LinearLayout.
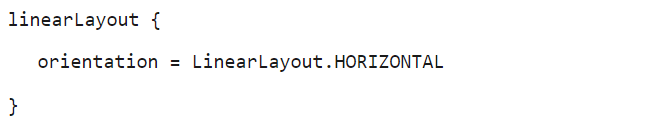
LinearLayout can have a vertical and horizontal position. This we can set by using the orientation attribute. In Anko, we directly have a specific DSL block for vertical – verticalLayout.
If you want to use LinearLayout with horizontal orientation you can write:
In the next step we define parameters for our verticalLayout and usernameEditText. In Anko this is done by using lparams function:
class SingInView : AnkoComponent<SignInActivity> {

  override fun createView(ui: AnkoContext<SignInActivity>) = with(ui) {
    verticalLayout {
      lparams(width  = matchParent, height = matchParent)

      editText {
        id = R.id.usernameEditText
        hintResource = R.string.sign_in_username
        textSize = 24f
      }.lparams(width = matchParent, height = wrapContent)
    }
  }

}
Note: In Anko, you specify LayoutParams right after a View description. This is recommended by official documentation. Sometimes it is also possible to define it inside of a view, but with some limitations and drawbacks. You can read this GitHub issue for better understanding.
Now, the time is right to try and run our application and see if everything is working. Before we can run it we must finish the last two steps:
- to assign newly created Anko component to the activity.
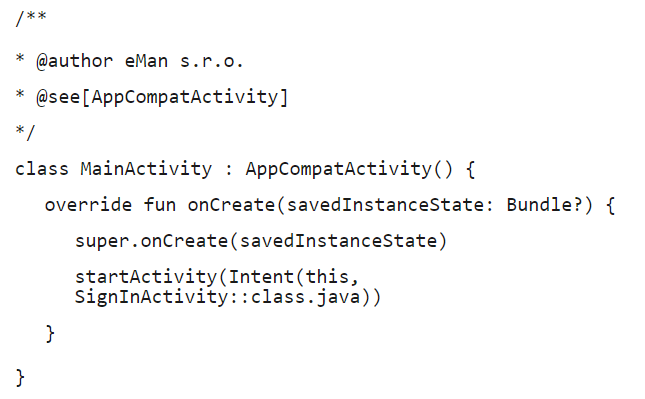
- to redirect our application flow from the
MainActivitytoSignInActivity.
Open SignInActivity. To define that our view must be create from our SignInView (AnkoComponent) is very easy. Just add to onCreate method this line of code (below super.onCreate(…) call):
class SignInActivity : AppCompatActivity() {

  override fun onCreate(savedInstanceState: Bundle?) {
    super.onCreate(savedInstanceState)
    SingInView().setContentView(this)
  }
}
To test if the app is working, just add definition to start SingInActivity from our MainActivity. In part 3, we will explain how we can use intents and how to start a new activity more easily thanks to Anko but for now just do it in a default Android way:
And run application:
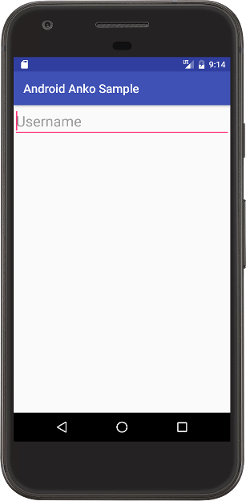
Note: Please ignore how the application look like in part 1 of this post. In future posts we will make it nicer.
Great, our application is running and a view defined in the AnkoComponent (SingInView) is working too. As a next step, add an editText widget for a password.
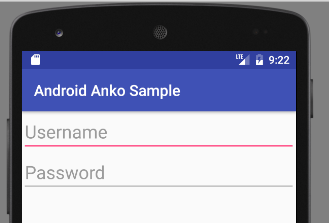
We learned how to use the editText widget. Now we will focus on how to add a button. Thanks to Anko we have similar DSL block like for editText. Much more easier way how to add a button is:
button("Sign In")
That’s cool – don’t you think? Run the app:
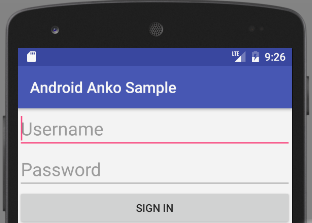
Ta-da! Our SignIn button is there! 🙂
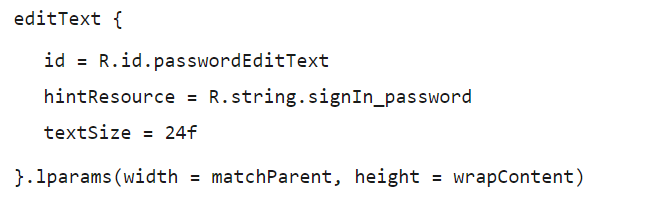
Of course, we should do it better so we must define an id of button, size parameters, and later action meaning what happens if a user presses this button.
Final code of our SignView looks like:
class SingInView : AnkoComponent<SignInActivity> {

  override fun createView(ui: AnkoContext<SignInActivity>) = with(ui) {
    verticalLayout {
      lparams(width  = matchParent, height = matchParent)

      editText {
        id = R.id.usernameEditText
        hintResource = R.string.sign_in_username
        textSize = 24f
      }.lparams(width = matchParent, height = wrapContent)

      editText {
        id = R.id.passwordEditText
        hintResource = R.string.signIn_password
        textSize = 24f
      }.lparams(width = matchParent, height = wrapContent)

      button {
        id = R.id.signIn_button
        textResource = R.string.signIn_button
      }.lparams(width = matchParent, height = wrapContent)
    }
  }

}
Summary of Part 1
In this first post you learned how to create a new Android project with Kotlin step-by-step, how to configure Gradle files to work with Kotlin and finally create your first view (Sign In) in Anko DSL library.
In the next post (part 2) we will add more logic to our Sign In process. You will learn how to work with threads, Intents, toasts, and dialogs by using the Anko library.
Thank you for reading and stay tuned.