
Flutter is a mobile framework for the development of multiplatform native apps, so from one code we will get an app that can run on Android as well as on iOS. It is a similar experiment to Xamarin from Microsoft a few years ago. In this series, we will create an app in Flutter and show you how it all works.
Let’s Develop a Mobile App in Flutter (1/3)

Flutter developers released a second beta version of the Flutter framework at the beginning of April. It is the second beta version released in just the last month and a half. It seems that after a long development period, there will be a stable version of the framework released quite soon.
Flutter developers released a second beta version of the Flutter framework at the beginning of April. It is the second beta version released in just the last month and a half. It seems that after a long development period, there will be a stable version of the framework released quite soon. In this article we will present the basic interface setting for using Flutter and describe its project structure. We will also use a simple project from the Flutter developers to show how to create an app for Android and iOS that has a UI corresponding to the given platform.
If you are a Flutter guru already (or if you know your way around it), you will not find much new information in this article. But we believe that you will discover some interesting tips and tricks in this series nonetheless.
Let’s get started
The Dart programming language is used for creating Flutter applications. Dart is an object oriented programming language and its syntax is very similar to Kotlin’s, even though it might be a bit more wordy. You can check its specifications and syntax on the official website. We will not discuss Dart much in this article but we will still present a few basic language constructs.
SDKs
We need to have the Flutter and Dart SDKs installed in order to be able to start using Flutter. The installation of the SDK packages is partially dependent on your operating system. We will show only the main commands here, other details and differences can be found on the official Flutter webpage. Because Flutter is in beta, the SDK installation is performed by cloning the official repository, therefore you need to have a git client installed.
git clone -b beta https://github.com/flutter/flutter.git
Then you need to add the path to Flutter to the interface variable PATH. After a correct setup we can call Flutter relatively, thanks to which we ensure the correct function of all other available Flutter tools. Next, we will need the SDK and the relevant development tools for our intended platform. The only development restriction for iOS (or let’s say of the final app assembly) is the necessity of having a device with macOS. Finally, we need to install all the dependent components using the following command. The same command can also be used for the overall configuration check of our interface.
flutter doctor
As Flutter is constantly being developed, the stable SDK version changes on a daily basis. That is why we recommend running the following command every time before you start or continue the development of your Flutter app. It will perform the update of all necessary SDK packages.
flutter upgrade
Editor
We recommend using Android Studio for the development. Flutter developers offer a plugin that will make the creation of your new project a piece of cake. All the following examples will be presented in Android Studio. You can find all the necessary details for the installation of Android Studio and the plugin on the official Flutter website.
Project creation
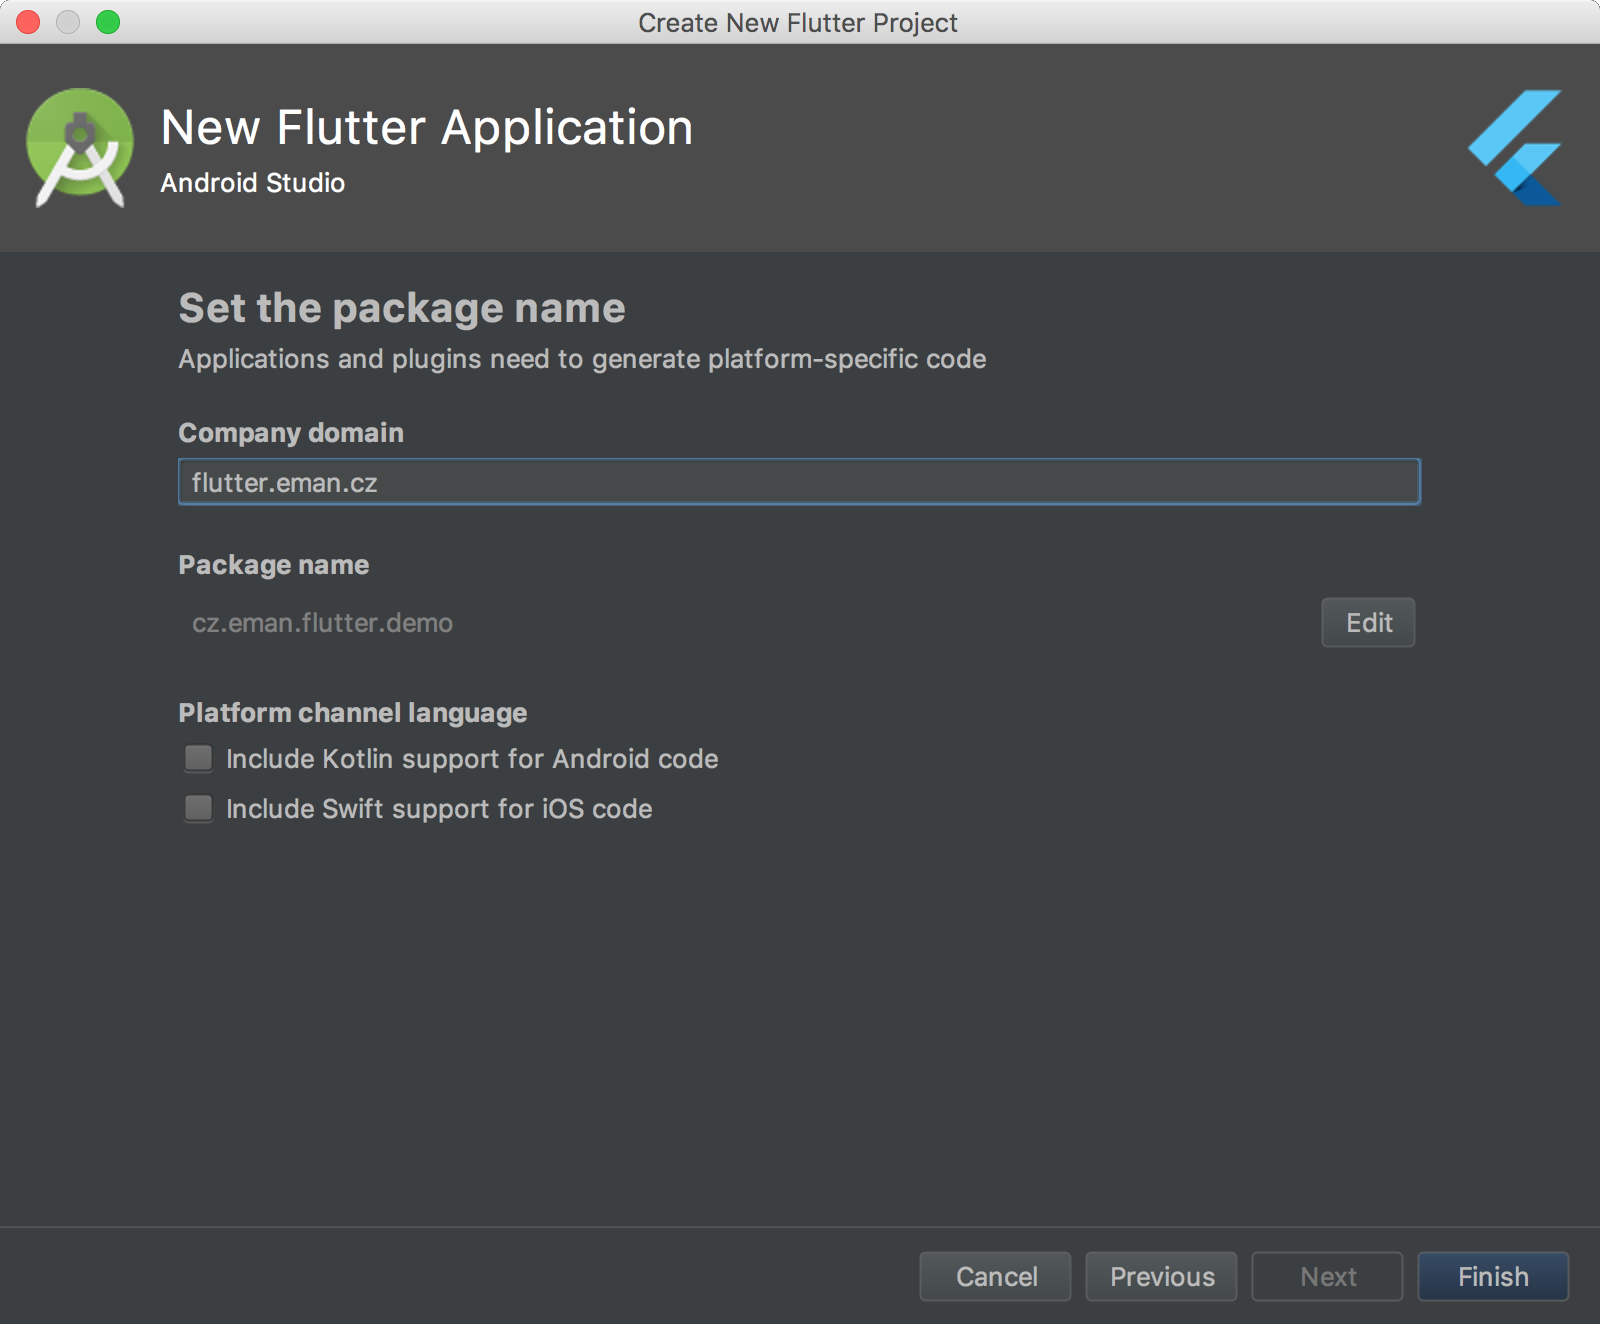
If you have the Android Studio and the plugin installed, the creation of a new project is a cakewalk. Select the Create New Flutter Project option and go through a simple wizard that will help you set up the basic project configuration.
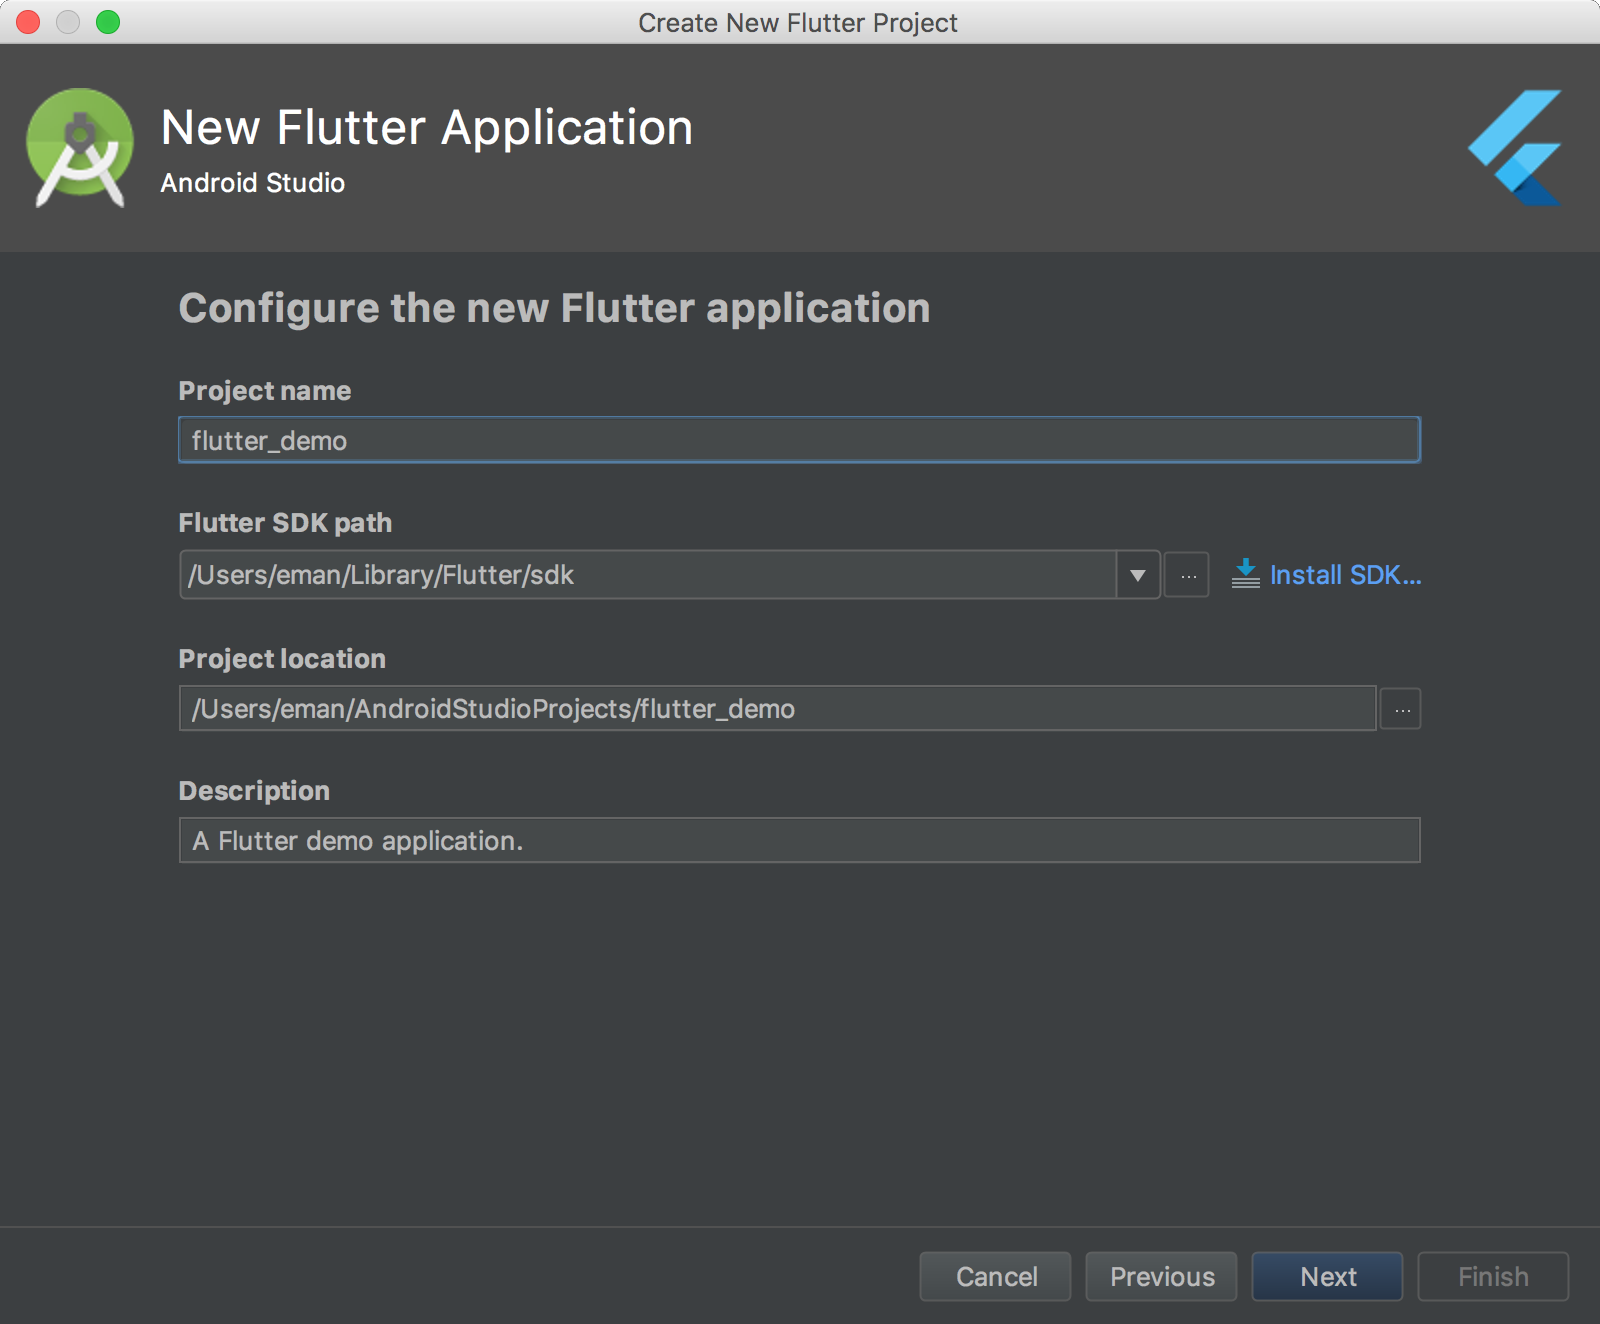
After the creation, the project contains all the necessary parts for a correct setup and run of the final app as well as a demo project prepared by Flutter developers. In the next part we will use this demo project to show how to create apps for both platforms with ease. In the end, the apps will look as if they are created by a native development process.
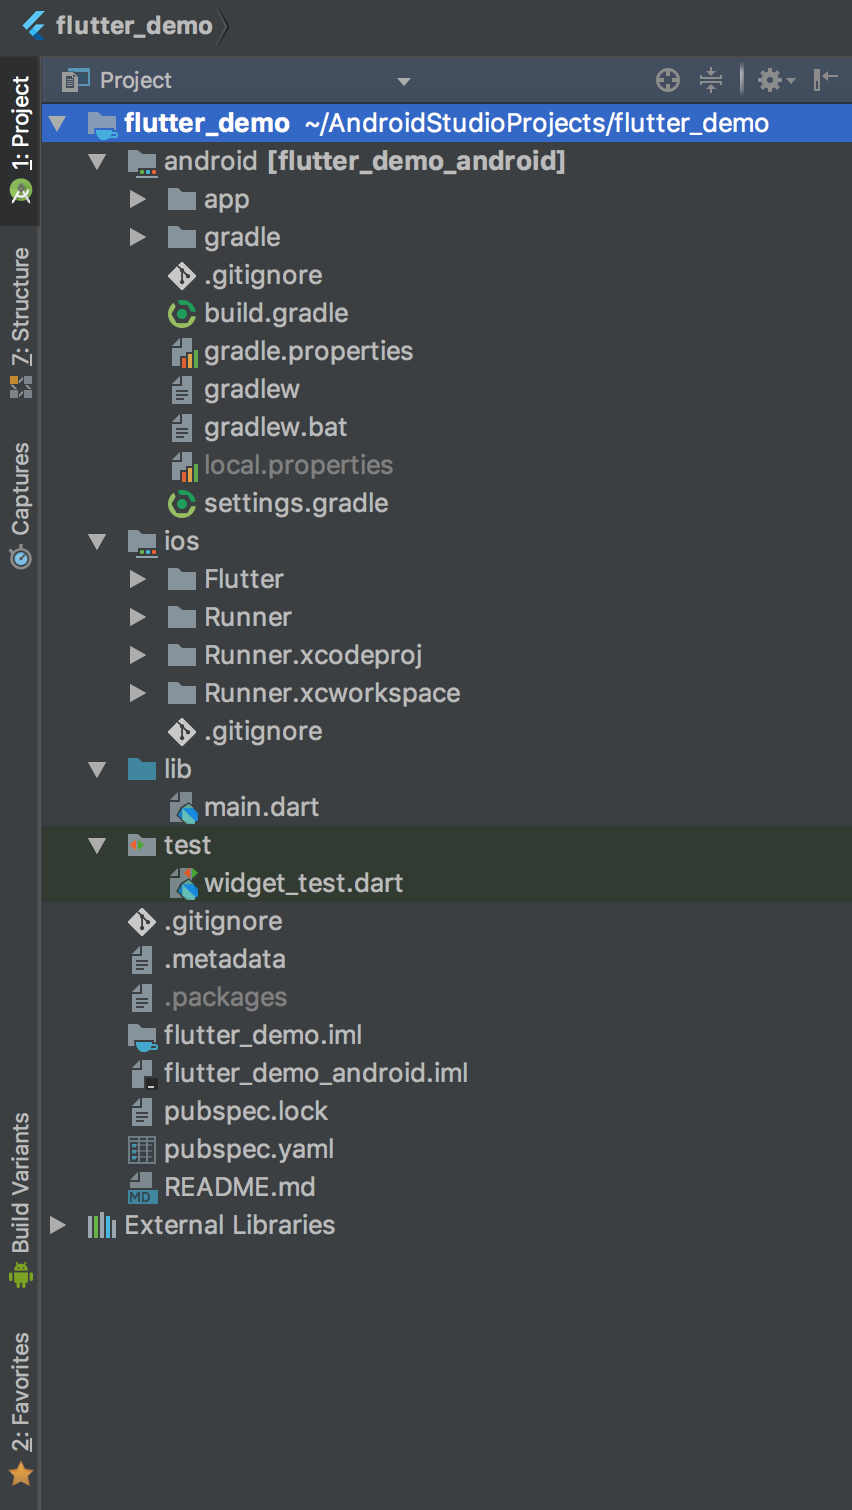
Project’s structure
The structure of every Flutter project looks more or less like this:
- The
androiddirectory – here we will find the classic Android project. In theappmodule we can find the actual Android app that already contains a few generated files. These are for connecting the Flutter app to the classic Android app. All Android specific configurations, the applicationId definition for example, supported SDKs, or signing certificates will be modified here. - The
iosdirectory – here we will find the typical iOS project. It already contains a few generated files used for connecting the Flutter app to the classic iOS app. All iOS specific configuration is to be done in this directory - The
libdirectory – the most important directory where the Flutter app files are stored. The main file here ismain.dartcontaining thevoid main()function which is the input function for the Flutter app. - File
pubspec.yaml– this file is for the Flutter app configuration. We also define the dependencies on external Flutter modules and Dart libraries in this file. For example, to add a library for detecting information about the device on which the app runs, we only need to add the following dependency.
dependencies:
  ...
  device_info: "^0.2.0"
Flutter application
Assembly of the app
To assemble the final app, we only need to enter one of the following commands, depending on the selected platform. The assembly can be parameterized to a certain degree. The currently supported parameters can be displayed by the last two commands.
flutter build apk          # Build an Android APK file from your app.
flutter build ios          # Build an iOS application bundle (Mac OS X host only).
flutter build apk --help   # Print build parameters
flutter build ios --help   # Print build parameters
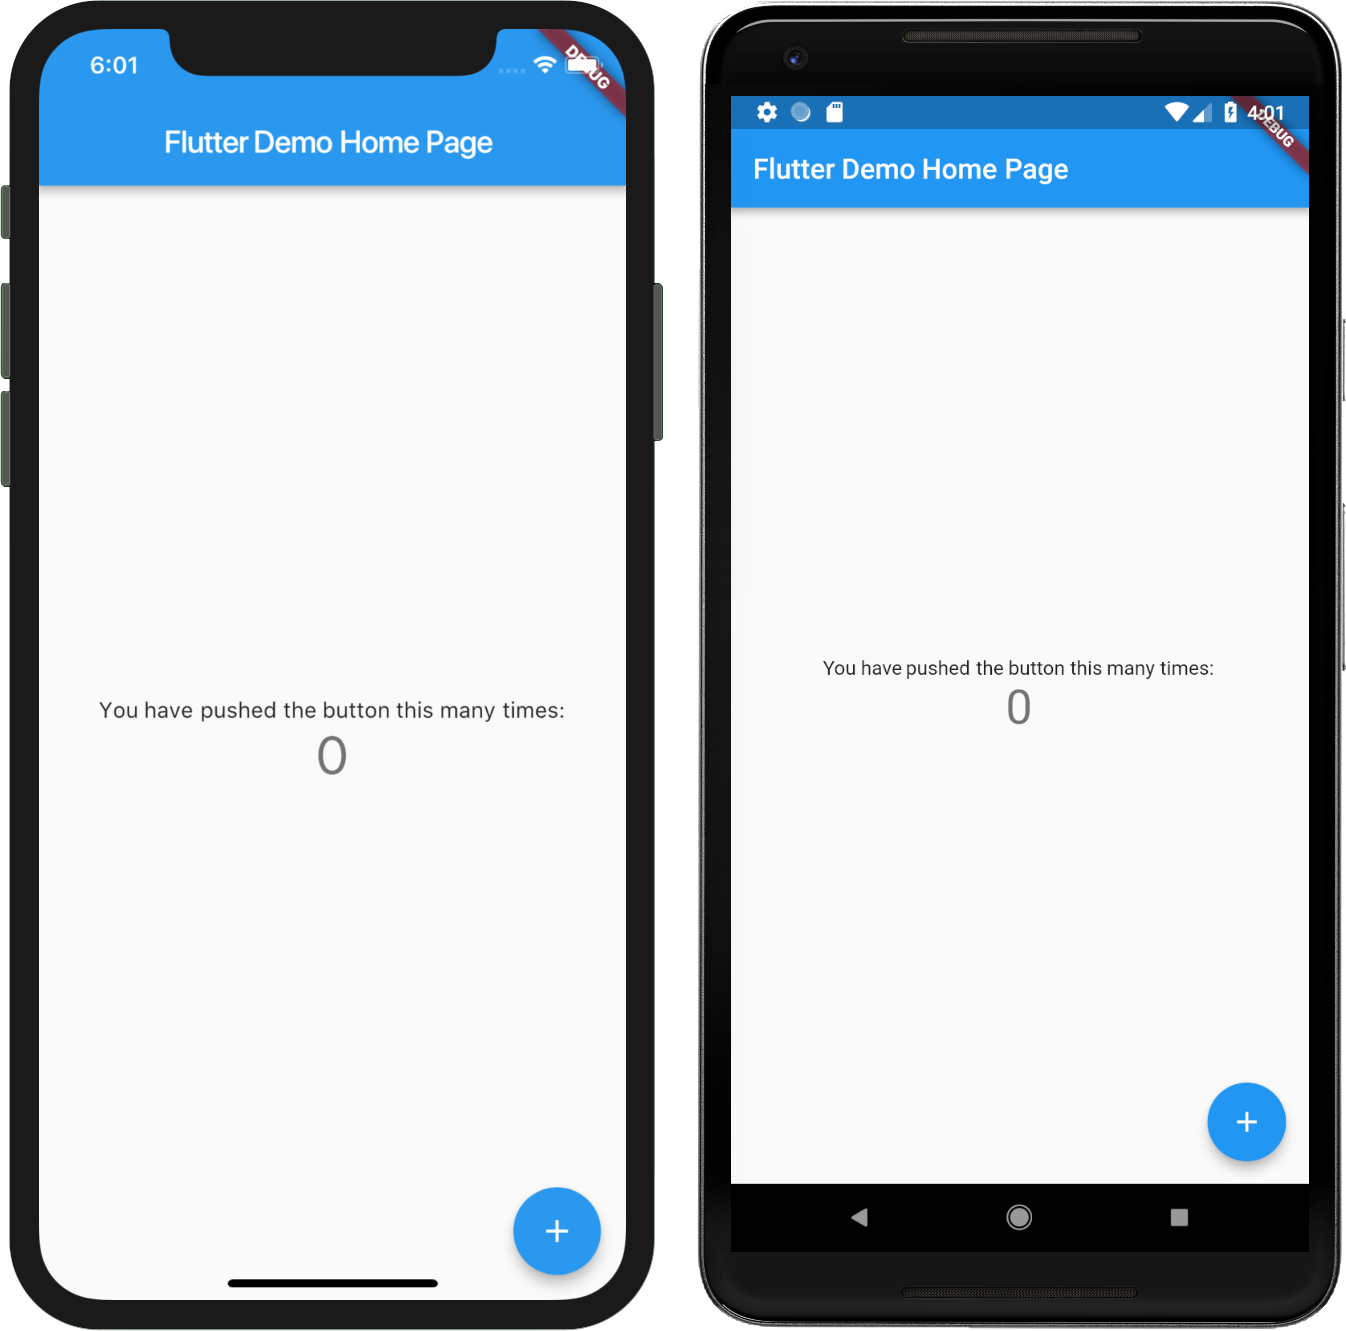
As you can see, the final apps created from one code for iOS and Android look alike. After installing the demo app on a specific end device (iPhone X, Pixel 2 XL), it looks like this:
Expanding the demo app
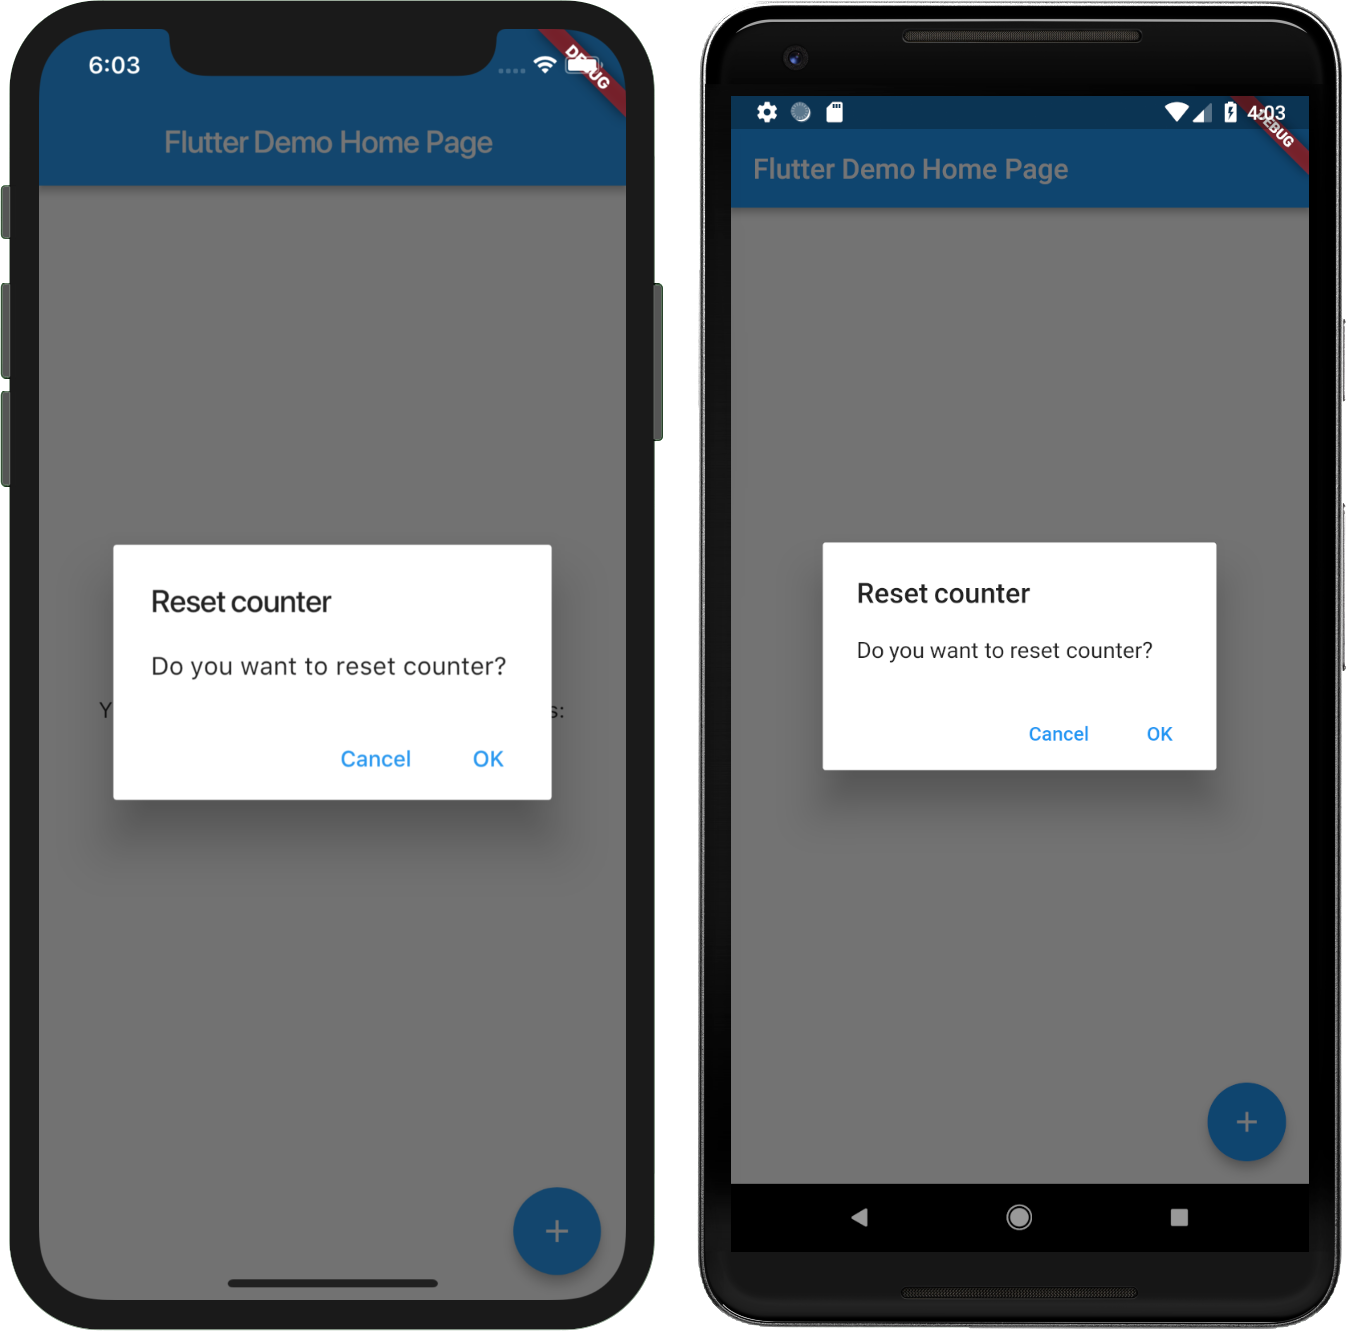
Let’s add more simple logic to the app. After every fifth click on the + button, the app will show a simple dialogue with a query if the user wishes to reset the counter or continue. The user will then, using the dialogue buttons, choose one option. When the OK button is pressed, the counter will reset and the dialogue ends. When pressing the Cancel button, the dialogue will end. At the end of the _incrementCounter method from the _MyHomePageState class, we will add the following code:
if (_counter % 5 == 0) {
  showDialog(
      context: context,
      barrierDismissible: false,
      builder: (BuildContext context) {
        return /*TODO create dialog*/
      });
}
Every time the variable _counter is divisible by five, the dialogue will be shown, so everything is set up as we wanted. Now we need to create a function that will create a dialogue with the requested functionality.
Material design dialogue
Let’s add a new method that will create a new alert dialogue in material design to the _MyHomePageState class. The basis is the AlertDialog class, which awaits in the constructor for the configuration of the dialogue being created. An important parameter is the actions field where the individual dialogue buttons are defined. The method for creating the dialogue is as follows:
AlertDialog _createMaterialAlertDialog() => new AlertDialog(
    title: new Text('Reset counter'),
    content: new Text('Do you want to reset counter?'),
    actions: <Widget>[
      new MaterialButton(
        onPressed: () {
          Navigator.pop(context);
        },
        child: new Text('Cancel'),
      ),
      new MaterialButton(
          onPressed: () {
            setState(() {
              _counter = 0;
            });
            Navigator.pop(context);
          },
          child: new Text('OK')),
    ],
  );
iOS design dialogue
The dialogue creation is the same as the preceding one, but instead of the material design component we will use components from the cupertino package. The method for creating the dialogue is as follows:
CupertinoAlertDialog _createCupertinoAlertDialog() => new CupertinoAlertDialog(
    title: new Text('Reset counter'),
    content: new Text('Do you want to reset counter?'),
    actions: <Widget>[
      new CupertinoButton(
        onPressed: () {
          Navigator.pop(context);
        },
        child: new Text('Cancel'),
      ),
      new CupertinoButton(
          onPressed: () {
            setState(() {
              _counter = 0;
            });
            Navigator.pop(context);
          },
          child: new Text('OK')),
    ],
  );
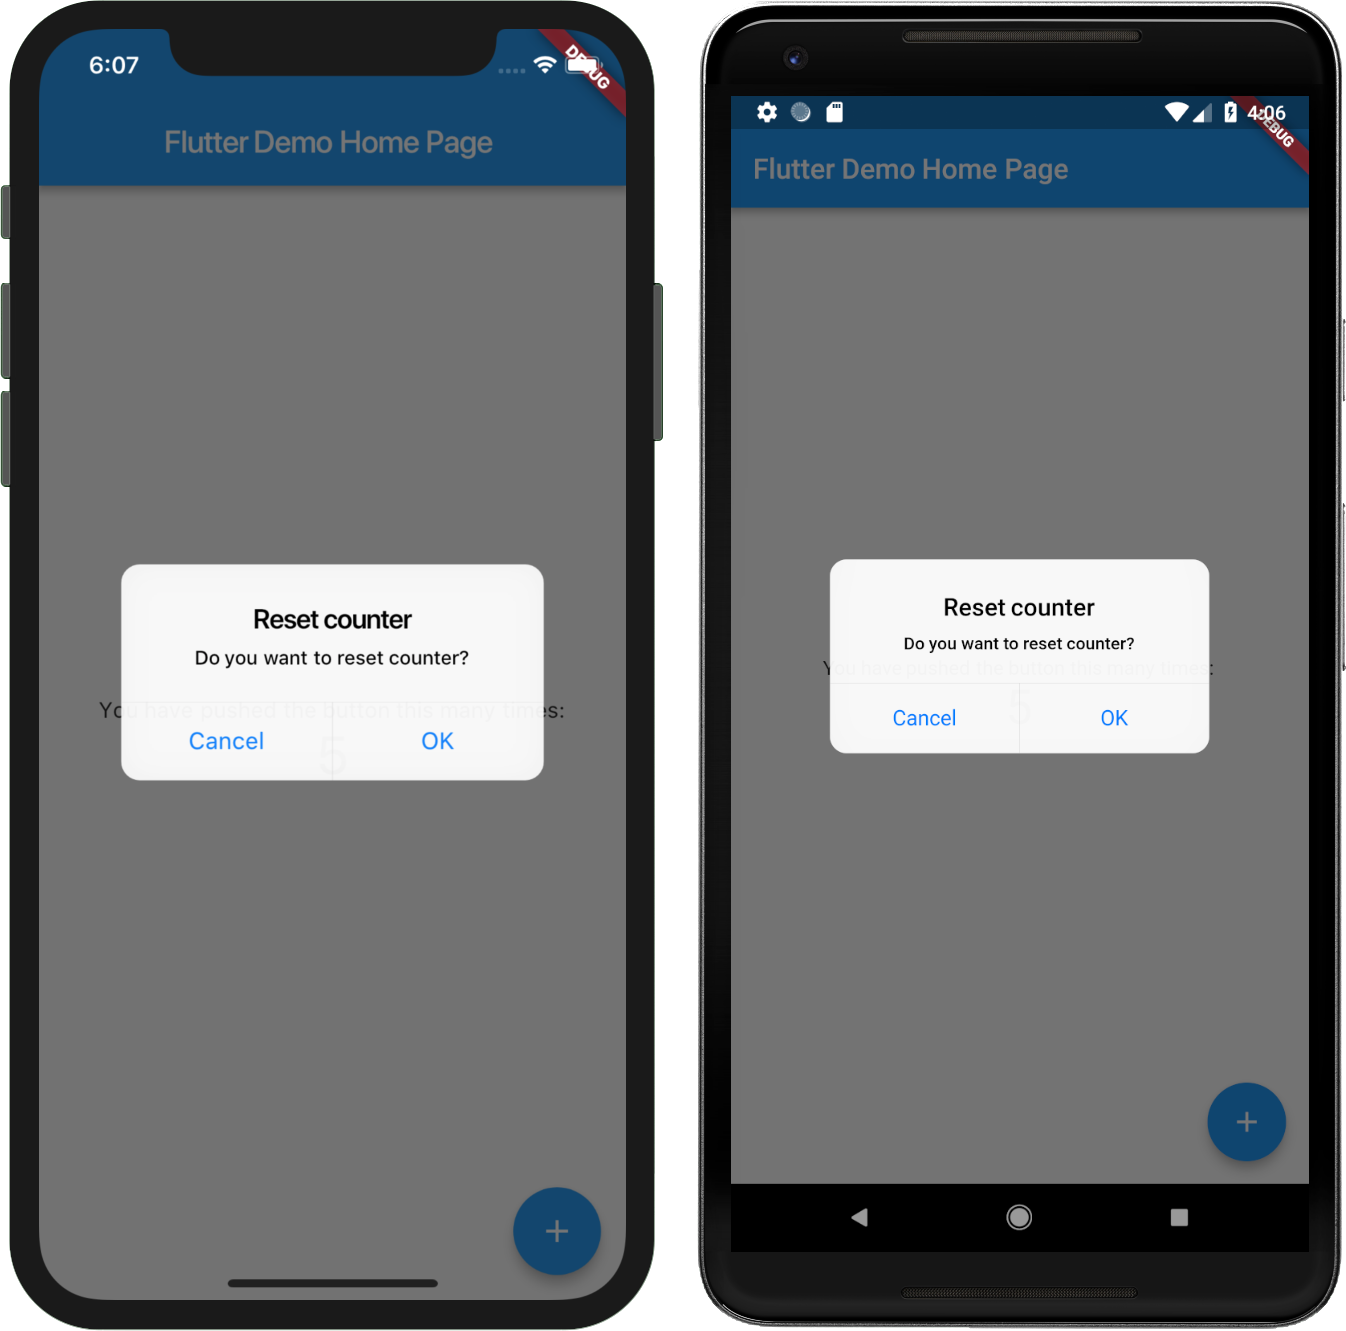
Dialogue based on the target platform
Let’s now combine both concepts together and add a logic that will ensure that the correct dialogue is displayed based on the platform on which the app is running. It is quite simple; we only need to ask what the used platform is.
if (_counter % 5 == 0) {
  showDialog(
      context: context,
      barrierDismissible: false,
      builder: (BuildContext context) {
        return Platform.isIOS
            ? _createCupertinoAlertDialog()
            : _createMaterialAlertDialog();
      });
}
As you have probably noticed, the app now contains a lot of redundant code – the source code for both methods for the creation of corresponding dialogues is virtually the same. It differs only in places where we are calling the appropriate class for displaying a specific element. In one of the following articles we will show how to, at least partially, get rid of these redundancies.
Conclusion
In today’s article we did an overview of Flutter, showed the initial steps needed before starting the creation of a Flutter app and described the parts of the Flutter project. We also extended the prepared demo project with the platform dependent dialogue displaying functionality. You can find the whole project at our GitHub.
We will present the basic constructions of the Dart programming language next. We will also show how Flutter actually works from the inside and start creating an app for displaying events, event registrations, and notifications about any event changes.