
In the last article of this series we will learn how to create an Anko DSL layout in a fragment. We’ll also learn how to use the RecyclerView component, again using the DSL definition.
Kotlin – Introduction to Anko for Android (4/4)

In the first article we presented how to create the UI which we defined as separate components (AnkoComponent) and we learned how to use these inside an activity. In the second article we sprinkled a bit of logic on top of our demo application. And in the third one we improved our UI.
In this last article we will learn how to use the AnkoComponent even for the definition of the UI layout in fragments. We’ll learn the definition of a custom view for a dialogue and how to use FAB buttons. And, last but not least, we will have a look at the RecyclerView component usage and we’ll once again create the UI layout in Anko DSL.
List of all parts of the series:
1. Setting up the project in Android Studio 3 and creating the first view in Anko
2. Buttons, Toasts, Alert Dialogs, Intents, UI & Background Threads
3. View Enhancements
4. Fragments & RecyclerView
Fragments
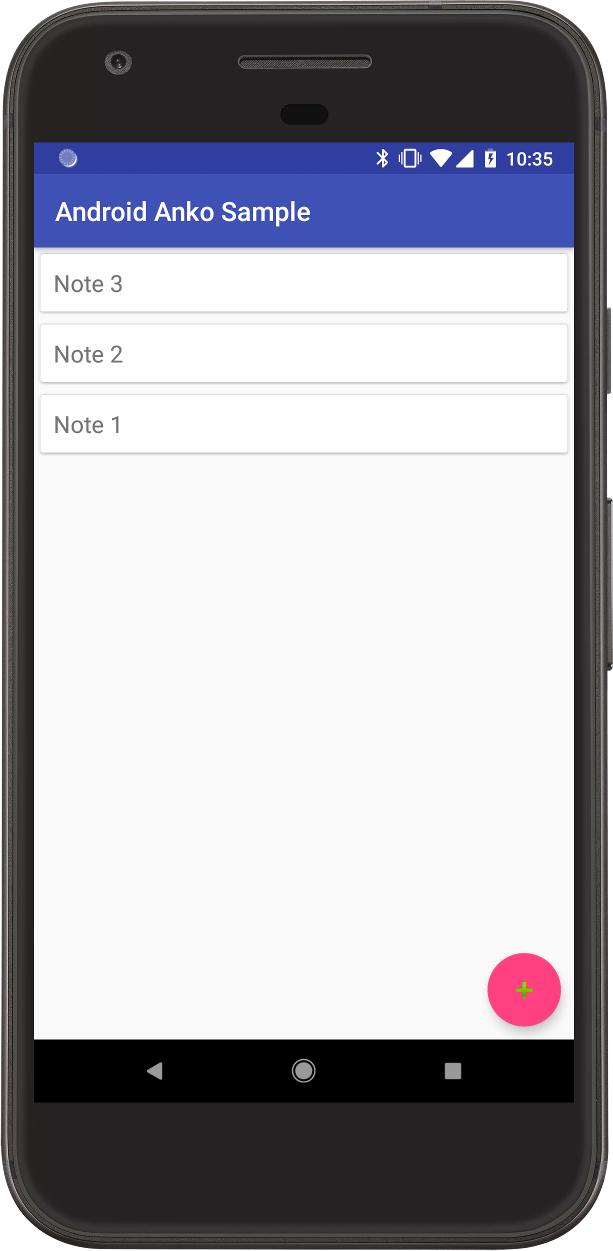
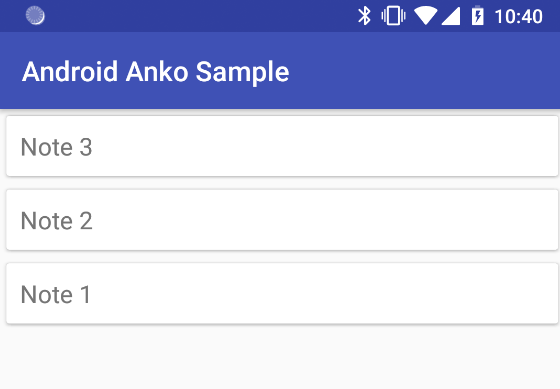
Up until now, we have created a simple Sign In function as an activity. Now, we will add a new function to it: notes. After a successful entry of the user name (frosty) and password (snowman) the application flow will be redirected to a new function allowing you to add notes. The note can be added by pressing the FAB button and entering the note into the dialogue box.
The application will look like this:
We’ll create a new notes package with these classes:
- NotesFragment
- NotesView
- ContainerActivity
- ContainerView
NotesFragment will be used for adding and displaying new notes. UI layout will be defined in the Anko component, the NotesView in this case.
First, let’s create the NotesFragment class inheriting Fragment from the library support:
class NotesFragment : Fragment()
Then we’ll create the Anko component NotesView and use it for its reference in the NotesFragment:
class NotesView : AnkoComponent<NotesFragment>
Let’s get back to the NotesFragment class. We have already learned how to create an activity and set the content view in it as a reference of the UI created in the Anko component. All of this in the onCreate function:
class SignInActivity : AppCompatActivity() {
override fun onCreate(savedInstanceState: Bundle?) {
super.onCreate(savedInstanceState)
SingInView().setContentView(this)
}
}
But how to do this in a fragment? It’s almost the same as in the activity. We will create an instance of the Anko component (NotesView) in the onCreateView function and, using the createView function, we’ll create the Anko Context. There we’ll define the reference as owner for the NotesView.
class NotesFragment : Fragment() {

    override fun onCreateView(inflater: LayoutInflater, container: ViewGroup?, savedInstanceState: Bundle?): View? {
        return NotesView().createView(AnkoContext.Companion.create(inflater.context, this, false))
    }

}
We have a rough concept for the function of adding a new note and its display in a list. But we still have to enter the fragment and tell the system when and under what conditions to use it.
The ContainerActivity will contain the frame layout for adding and displaying the fragment with notes, which we will define in a separate class ContainerView.
class ContainerActivity : AppCompatActivity() {

    override fun onCreate(savedInstanceState: Bundle?) {
        super.onCreate(savedInstanceState)
        ContainerView().setContentView(this)

        if (savedInstanceState == null) {
            supportFragmentManager.beginTransaction().replace(R.id.container, NotesFragment()).commit()
        }
    }
}
class ContainerView : AnkoComponent<ContainerActivity> {

    override fun createView(ui: AnkoContext<ContainerActivity>) = with(ui) {
        frameLayout {
            id = R.id.container
        }
    }

}
The first two articles tackled the function for user login into the application. If the login is successful, we will now redirect the user to the ContainerActivity:
startActivity<ContainerActivity>()
class SignInActivity : AppCompatActivity() {

    // ...

    fun authorizeUser(username: String, password: String) {
        doAsync {
            // ...
            activityUiThread {
                if (authorized) {
                    startActivity<ContainerActivity>()
                } else {
                    view.showAccessDeniedAlertDialog()
                }
            }
        }
    }
}
Let’s now define the basic UI layout in the NotesView. First, we will create the RelativeLayout and add the FAB button. For this purpose, we need to add a few more dependencies:
implementation com.android.support:design:27.0.2
implementation org.jetbrains.anko:anko-design:0.9.1
implementation org.jetbrains.anko:anko-appcompat-v7:0.9.1
We created a project structure in which we define all dependencies in dependencies.gradle and we will refer to these dependencies in app/build.gradle. If you are using your own structure, then add the dependencies directly to the app/build.gradle file.
/**
 * UI layout definition for a [MainActivity]
 *
 * @author eMan s.r.o.
 * @see[AnkoComponent]
 * @see[MainActivity]
 */
class NotesView : AnkoComponent<NotesFragment> {

    override fun createView(ui: AnkoContext<NotesFragment>) = with(ui) {
        relativeLayout {
            lparams(width = matchParent, height = matchParent)

            floatingActionButton {
                imageResource = android.R.drawable.ic_input_add
            }.lparams {
                gravity = Gravity.BOTTOM or Gravity.END
                margin = dip(10)
                alignParentBottom()
                alignParentEnd()
                alignParentRight()
            }
        }
    }

}
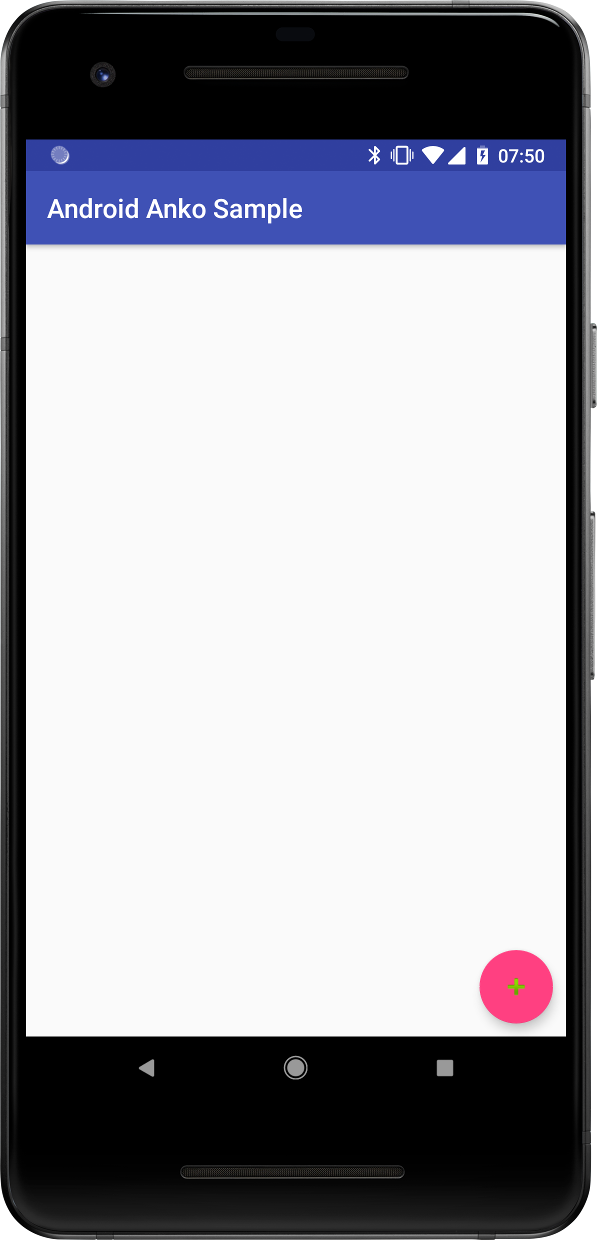
If you examine the code or the picture, you’ll see that we created a simple layout (RelativeLayout) with the FAB button. Similarly to buttons and other UI components, the FAB also has the onClick dsl block available. We’ll also add a feature for displaying a dialogue which will allow the user to enter a new note:
class NotesView : AnkoComponent<NotesFragment> {

    private lateinit var ankoContext: AnkoContext<NotesFragment>

    override fun createView(ui: AnkoContext<NotesFragment>) = with(ui) {
        ankoContext = ui
        relativeLayout {
            lparams(width = matchParent, height = matchParent)

            floatingActionButton {
                imageResource = android.R.drawable.ic_input_add
                onClick {
                    showAddNewNoteDialog()
                }
            }.lparams {
                gravity = Gravity.BOTTOM or Gravity.END
                margin = dip(10)
                alignParentBottom()
                alignParentEnd()
                alignParentRight()
            }
        }
    }
}
As you can see on lines 3 and 6, we defined the anko context as a global property that we will use in the method for creating the alert dialogue for adding the note:
private fun showAddNewNoteDialog() {
        with(ankoContext) {
            alert {
                title(R.string.notes_dialog_new_note_title)
                        positiveButton(R.string.notes_dialog_new_note_button_positive) {
                          // TODO
                        }

                        negativeButton(R.string.notes_dialog_new_note_button_negative)
                    }
        }.show()
}

Note:
We have added the following texts since the last time:
<string name="notes_dialog_new_note_title">Add a New Note</string>
<string name="notes_dialog_new_note_button_positive">Add</string>
<string name="notes_dialog_new_note_button_negative">Cancel</string>
<string name="notes_dialog_new_note_hint">Write your note here ...</string>
The title and buttons for adding and closing the dialogue are shown in our new alert dialogue. But how do you include the EditText? The Alert DSL block contains an option for adding a custom UI layout using the customView {} block:
alert {
     title(R.string.notes_dialog_new_note_title)
     customView {
        verticalLayout {
            lparams(width = matchParent, height = matchParent)

            val noteEditText = editText {
                hintResource = R.string.notes_dialog_new_note_hint
            }.lparams(width = matchParent, height = wrapContent) {
                topMargin = dip(15)
                bottomMargin = dip(15)
                leftMargin = dip(20)
                rightMargin = dip(20)
            }

            positiveButton(R.string.notes_dialog_new_note_button_positive) {
                // TODO
            }

           negativeButton(R.string.notes_dialog_new_note_button_negative)

       }
     }
   }
 }.show()

The title in this dialogue probably does not look that good… Let’s use the toolbar component from the app-compat library!
alert {
  customView {
    verticalLayout {
      // ...

      toolbar {
        titleResource = R.string.notes_dialog_new_note_title
        backgroundColor = ContextCompat.getColor(ctx, R.color.colorPrimary)
        setTitleTextColor(ContextCompat.getColor(ctx, android.R.color.white))
      }

      // ...

    }
  }
}.show()
Much better! The user can now add a note, and the title also looks way better. But wait, when we press the ADD button, nothing happens… We forgot to define the onClick listener. So what will be the use-case for adding a note?
The user adds a note and after pressing the ADD button, the app will first check if there is any text in the note. If not, the toast message will be shown. Otherwise the note will be added to an adapter that will be used by the RecyclerView component. In order to accommodate, for example, for the change of the device’s orientation, the notes list will be held as a reference inside the NotesFragment.
RecyclerView
In this part, we will learn how to use the RecyclerView component using the Anko DSL layout.
But first we have to add the dependencies on the RecyclerView and CardView components and the corresponding libraries:
implementation “com.android.support:recyclerview-v7:27.0.2”
implementation “com.android.support:cardview-v7:27.0.2”
implementation "org.jetbrains.anko:anko-recyclerview-v7:0.9.1"
implementation "org.jetbrains.anko:anko-cardview-v7:0.9.1"
A classic layout for the ViewHolder would look like this:
<?xml version="1.0" encoding="utf-8"?>
<LinearLayout xmlns:android="http://schemas.android.com/apk/res/android"
              android:layout_width="match_parent"
              android:layout_height="wrap_content"
              android:orientation="vertical">

    <android.support.v7.widget.CardView
        android:layout_width="match_parent"
        android:layout_height="match_parent"
        android:layout_margin="5dp">

        <LinearLayout
            android:layout_width="match_parent"
            android:layout_height="wrap_content"
            android:orientation="vertical"
            android:padding="10dp">

            <TextView
                android:id="@+id/txtNote"
                android:layout_width="match_parent"
                android:layout_height="wrap_content"
                android:textAppearance="@style/Base.TextAppearance.AppCompat.Medium"/>

        </LinearLayout>

    </android.support.v7.widget.CardView>

</LinearLayout>
But we want to have everything in the Anko DSL. Therefore we’ll create a new class NotesItemView where we retype the layout into the DSL based on the above mentioned XML.
package cz.eman.android.sample.anko.notes.adapter

import android.support.v4.widget.TextViewCompat
import android.view.ViewGroup
import cz.eman.android.sample.anko.R
import org.jetbrains.anko.*
import org.jetbrains.anko.cardview.v7.cardView

/**
 * UI represents a single item contains a note.
 *
 * @author eMan s.r.o.
 * @see[AnkoComponent]
 */
class NotesItemView : AnkoComponent<ViewGroup> {

    override fun createView(ui: AnkoContext<ViewGroup>) = with(ui) {
        verticalLayout {
            lparams(width = matchParent, height = wrapContent)

            cardView {

                verticalLayout {
                    lparams(width = matchParent, height = wrapContent)
                    padding = dip(10)

                    textView {
                        id = R.id.txtNote
                        TextViewCompat.setTextAppearance(this, R.style.Base_TextAppearance_AppCompat_Medium)
                    }.lparams(width = matchParent, height = wrapContent)
                }

            }.lparams(width = matchParent, height = matchParent) {
                margin = dip(5)
            }

        }
    }

}
Creating the layout isn’t a difficult task. But you can see that the owner of this component is not a fragment nor activity because the given view is for the given view holder and thus we don’t need to access the adapter’s reference. That is why the simplest solution is to set the context as the owner or, as in our example, as the ViewGroup. There is also a more sophisticated solution but that goes beyond the scope of this series. You can try a few options described in this ticket.
Creating the NotesAdapter is then a bit more interesting:
package cz.eman.android.sample.anko.notes.adapter

import android.support.v7.widget.RecyclerView
import android.view.View
import android.view.ViewGroup
import kotlinx.android.synthetic.main.view_notes_item.view.*
import org.jetbrains.anko.AnkoContext

/**
 * An adapter which contains list of all available notes.
 *
 * @author vsouhrada (vaclav.souhrada@eman.cz)
 * @see[RecyclerView.Adapter]
 */
class NotesAdapter(private var notes: MutableList<String>) : RecyclerView.Adapter<NotesAdapter.NotesViewHolder>() {

    override fun onCreateViewHolder(parent: ViewGroup, viewType: Int): NotesViewHolder {
        return NotesViewHolder(NotesItemView().createView(AnkoContext.Companion.create(parent.context, parent)))
    }

    override fun onBindViewHolder(holder: NotesViewHolder?, position: Int) {
        holder?.bindItem(notes[position])
    }

    override fun getItemCount() = notes.size

    fun updateNotes(notes: MutableList<String>) {
        this.notes = notes
        notifyDataSetChanged()
    }

    fun addNote(note: String) {
        notes.add(note)
        notifyItemChanged(notes.size - 1)
    }

    /**
     * Describes an item note view about its place within the RecyclerView.
     *
     * @author eMan s.r.o.
     * @see[RecyclerView.ViewHolder]
     */
    inner class NotesViewHolder(itemView: View) : RecyclerView.ViewHolder(itemView) {

        fun bindItem(note: String) {
            itemView.txtNote.text = note
        }

    }
}
In the onCreateViewHolder(...) function we’ll create an instance of the already implemented Anko component NotesItemView. We set the parent view as the partner and used it also as a reference for the context. And thus we created the Anko component containing our layout in the DSL, we used a similar process for the fragment.
The updateNotes(notes: MutableList<String>) is for storing all available notes and their display in Recycler View.
The addNote(note: String) function then adds a new note to the list. This function will be called after pressing the ADD button from the add note dialogue.
Now, the “only” thing remaining is to add the Recycler View definition in the NotesView and an action for adding a note:
package cz.eman.android.sample.anko.notes

import android.support.v4.content.ContextCompat
import android.support.v7.widget.LinearLayoutManager
import android.view.Gravity
import cz.eman.android.sample.anko.R
import cz.eman.android.sample.anko.notes.adapter.NotesAdapter
import org.jetbrains.anko.*
import org.jetbrains.anko.appcompat.v7.titleResource
import org.jetbrains.anko.appcompat.v7.toolbar
import org.jetbrains.anko.design.floatingActionButton
import org.jetbrains.anko.recyclerview.v7.recyclerView

/**
 * UI layout definition for a [NotesFragment]
 *
 * @author eMan s.r.o.
 * @see[AnkoComponent]
 * @see[NotesFragment]
 */
class NotesView(private val notes: MutableList<String>) : AnkoComponent<NotesFragment> {

    private lateinit var ankoContext: AnkoContext<NotesFragment>

    private lateinit var notesAdapter: NotesAdapter

    override fun createView(ui: AnkoContext<NotesFragment>) = with(ui) {
        ankoContext = ui
        notesAdapter = NotesAdapter(notes)

        relativeLayout {
            lparams(width = matchParent, height = matchParent)

            recyclerView {
                layoutManager = LinearLayoutManager(context, LinearLayoutManager.VERTICAL, true)
                adapter = notesAdapter
            }.lparams(width = matchParent, height = wrapContent) {
                alignParentTop()
            }

            floatingActionButton {
                imageResource = android.R.drawable.ic_input_add
                onClick {
                    showAddNewNoteDialog()
                }
            }.lparams {
                gravity = Gravity.BOTTOM or Gravity.END
                margin = dip(10)
                alignParentBottom()
                alignParentEnd()
                alignParentRight()
            }
        }
    }

    fun updateNotes(notes: MutableList<String>) {
        notesAdapter.updateNotes(notes)
    }

    private fun showAddNewNoteDialog() {
        with(ankoContext) {
            alert {
                customView {
                    verticalLayout {
                        lparams(width = matchParent, height = matchParent)

                        toolbar {
                            titleResource = R.string.notes_dialog_new_note_title
                            backgroundColor = ContextCompat.getColor(ctx, R.color.colorPrimary)
                            setTitleTextColor(ContextCompat.getColor(ctx, android.R.color.white))
                        }

                        val noteEditText = editText {
                            hintResource = R.string.notes_dialog_new_note_hint
                        }.lparams(width = matchParent, height = wrapContent) {
                            topMargin = dip(15)
                            bottomMargin = dip(15)
                            leftMargin = dip(20)
                            rightMargin = dip(20)
                        }

                        positiveButton(R.string.notes_dialog_new_note_button_positive) {
                            val note = noteEditText.text.toString()
                            if (note.isNotEmpty()) {
                                notesAdapter.addNote(noteEditText.text.toString())
                            } else {
                                toast(R.string.notes_dialog_error_empty_note)
                            }
                        }

                        negativeButton(R.string.notes_dialog_new_note_button_negative)
                    }
                }
            }
        }.show()
    }

}
- We defined this new property for the
NotesAdapteron line 25 and its instance is then created on line 29. - We defined the
RecyclerViewon lines 34–39 with the reverseLayout=true parameter, to always have the newest note at the first place. TheupdateNotes(notes: MutableList<String>)function transmits all available notes, after the device has been rotated, for example. - On lines 83–88 we added the check to see if the note contains any text. If it doesn’t, a toast message will be shown. If the note contains some text, the
addNote()on the adapter will be called, adding the new note and making a notification that the data has been changed.
We also added a new ID and text:
<item name="txtNote" type="id"/>
<string name="notes_dialog_error_empty_note">Your note cannot be empty!!!</string
Summary
Alas, we’re finished. In this Anko library miniseries, we presented the basic functions which this library offers. We focused on how to use Anko for a simple display of dialogues, toasts, and background threads.
We also showed an interesting example of defining the UI layout directly in the code using the AnkoComponent instead of its standard definition in an XML file.
In this last part we’ve shown how the Anko component can be used for work with fragments and how you can work with the FAB button and dialogues with the custom view with a toolbar. And last but not least, we learned how to use the RecyclerView and, more importantly, how to define the layout for the ViewHolder in the DSL. You can get the demo application that was created throughout this series from our GitHub.
As the library is being constantly developed some new features were added even throughout this series, for example the support of Kotlin Coroutines for the background threads. That is why we will publish one more article that will present the most recent updates and new features added to the Anko library, starting from version 0.10+.
We hope that you enjoyed this series and that you also learned something new. See you next time!