
We already know how to create dialogues and use Dart. In the last article of this series, we will finally get to the creation of a more complex app. We’ll also discuss how to tackle the support of a platform dependent app. Let’s do this!
Let’s Develop a Mobile App in Flutter (3/3)
In the previous article we had a look into the Flutter framework, introduced Dart, and showed how to call the native interface of the given platform. This article will present possible localization options of the app and we’ll also have a brief look at the creation of a screen layout. Then we’ll incorporate all gained knowledge into our app and, as the final step, we’ll connect it to Firebase. That’ll give us a skeleton of what’s today probably the most used software architecture in mobile development – a mobile app that, in the client’s role, gathers data from a server database.
We make widgets (Abstract Factory pattern)
The first article tackled the creation of a platform dependent dialogue. The presented solution used the corresponding graphic component based on the identification of the target platform. This solution is not ideal as it calls a code with a large number of if-then-else constructions for the identification of the platform and subsequent usage of the specific component. This issue can be fixed, for example, by using the Abstract Factory design pattern.
Abstract Factory in general
The Abstract Factory design pattern is a part of a creational design pattern group. Abstract Factory is used for the creation of similar products and eliminates the usage of new. A group of objects created by a factory is then clearly determined by the relevant factory.
- Abstract Factory – declares an interface for the creation of a group of products
- Abstract Product – declares an interface of the relevant product
- Concrete Factory – contains an implementation for the factory creating specific products
- Concrete Product – contains an implementation of the specific product
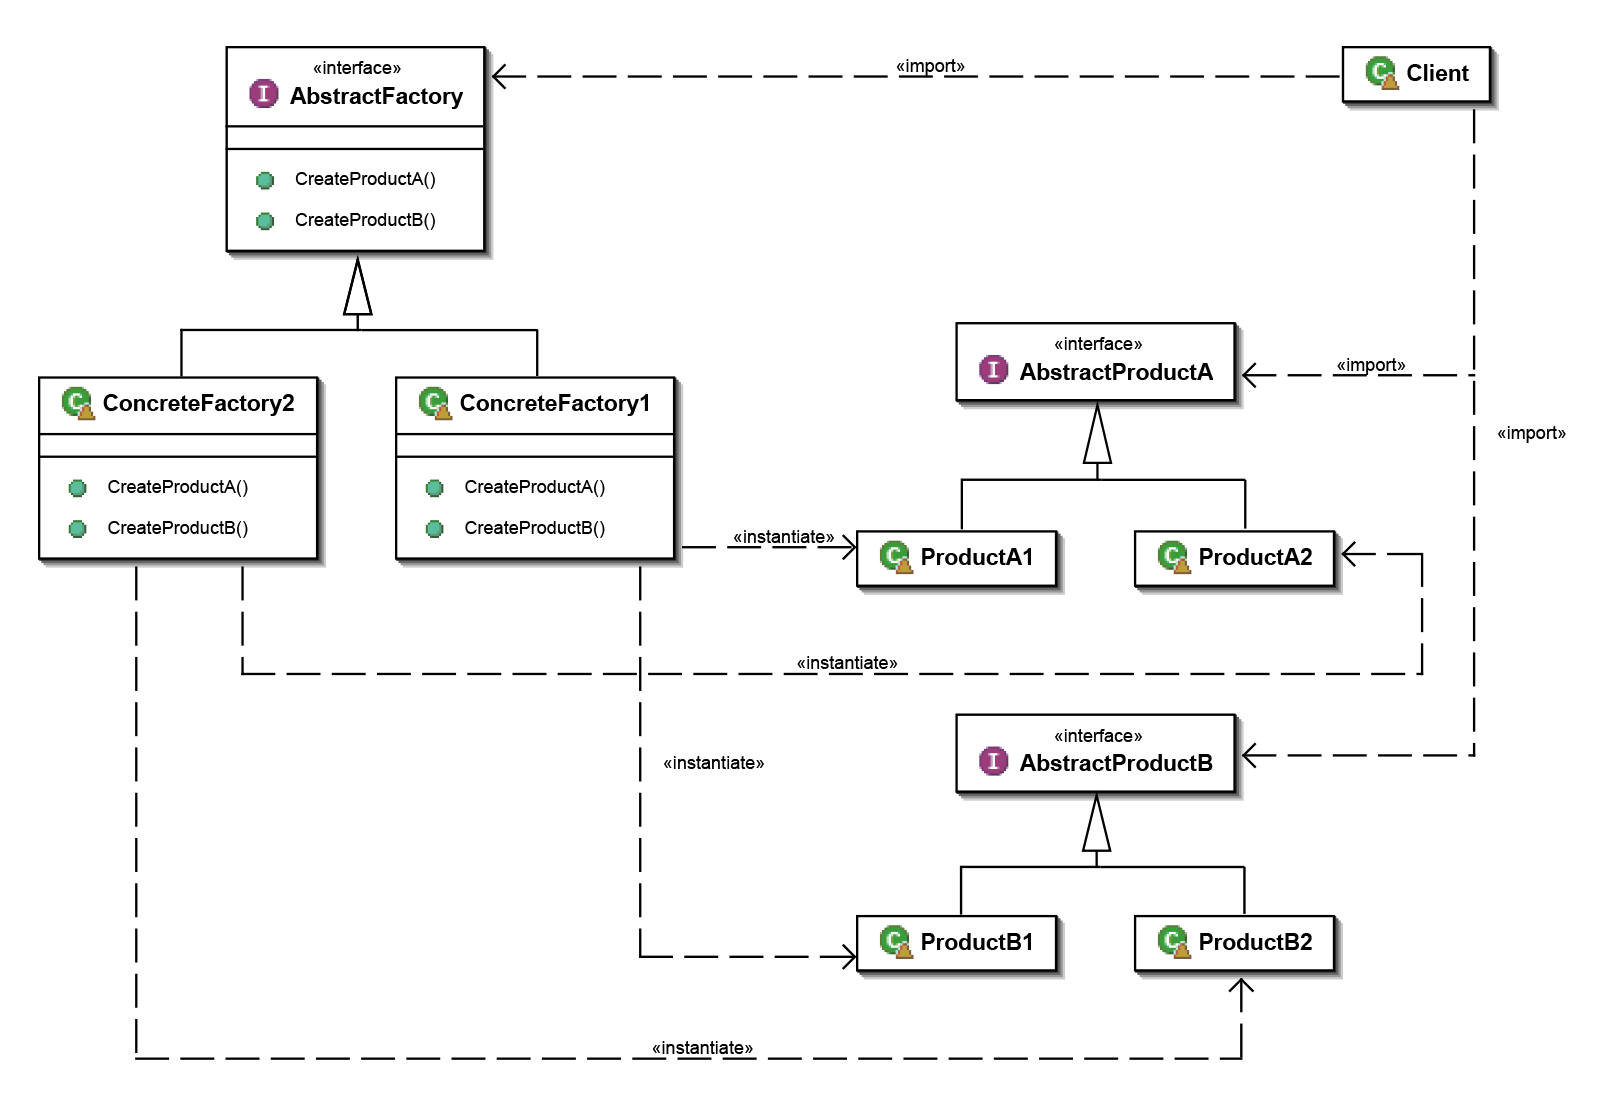
(Source: https://en.wikipedia.org/wiki/Abstract_factory_pattern)
To better understand it, picture this example: You’re building a house and want the windows and doors to be from a specific material. You can select from wood, plastic and aluminium, and the only restriction is that you can’t combine various materials.
- Abstract Factory offers the creation of a door or a window (Abstract Product) but does not specify which material will be used.
- Concrete Factory is a factory creating products from wood, plastic and aluminium, and Concrete Product is a product from a given material
You make your order in a given factory and you know that the supplied products will be from the same material. This way you get rid of asking over and over again: “What material should the door/window be made of?” Instead, you just submit another order to the factory you selected at the beginning.
Abstract Factory in more detail
Our abstract factory will offer an interface for the creation of various graphics and other elements. The creation of the elements itself will be taken care of by two factories, one for Android and another for iOS style. But how do you determine what elements to create in the factory and what elements to create in a different way? We can approach this question from several angles:
- creating all graphic components
- creating all components that are in the
materialorcupertinopackage - creating only the components that exist in both graphic versions
We decided to choose the second option as it’s a nice compromise between the other possibilities. Moreover, if an alternative component is implemented in the other package in the future, adding the component will be way easier. Then the source files should not contain any package:flutter/cupertino.dart or ipackage:flutter/material.dart import in other files than the ones containing the implementation of relevant factories.
When declaring the individual interface methods, it’s recommended to use the “Optional named parameters“ thanks to which the interface change (in a sense of adding a new parameter) influences only the specific factories implementing the given interface and leaves the places where the interface methods are called untouched.
Here is the creation of Scaffold and AppBar components as an example. You can find the whole interface in the widget_factory.dart file.
abstract class WidgetFactory {
  Widget createScaffold({PreferredSizeWidget appBar, Widget body});

  PreferredSizeWidget createAppBar({Widget title});
  ...
}
The implementation of the given factories that ensures the creation of the relevant component based on the requested style:
class _AndroidWidgetFactory implements WidgetFactory {
  @override
  Widget createScaffold({PreferredSizeWidget appBar, Widget body}) {
    return Scaffold(appBar: appBar, body: body);
  }

  @override
  PreferredSizeWidget createAppBar({Widget title}) {
    return AppBar(title: title);
  }
  ...
}

class _IOSWidgetFactory implements WidgetFactory {
  @override
  Widget createScaffold({PreferredSizeWidget appBar, Widget body}) {
    return CupertinoPageScaffold(navigationBar: appBar, child: body);
  }

  @override
  PreferredSizeWidget createAppBar({Widget title}) {
    return CupertinoNavigationBar(middle: title, backgroundColor: Colors.white);
  }
  ...
}
All the necessary classes are ready. We only need to add the logic for the initialization of the factory that will create the elements while the app is running. We used a Singleton design pattern that will make sure that the whole running app will use only one instance of the specific factory. Dart offers the “Factory constructor“ for the creation and a clean usage of Singletons. As we can see from the example, the logic for determining on what system the app is running is only in one place.
abstract class WidgetFactory {
  static WidgetFactory _instance;

  factory WidgetFactory() {
    if (_instance == null) {
      if (Platform.isAndroid) {
        _instance = _AndroidWidgetFactory();
      } else if (Platform.isIOS) {
        _instance = _IOSWidgetFactory();
      } else {
        throw UnsupportedError('Unsupported target platform.');
      }
    }
    return _instance;
  }
  ...
}

// using
WidgetFactory().createScaffold(...);
Note: We could use a static method getInstance() for the creation of the Factory construction for returning the class instance in Java.
Pros and cons
- Pros
- Decrease of redundancies in the code
- Getting rid of
if-then-else - Object creation control (easier to mock up)
- Platform-dependent app
- Solution reusability – all you need to do is create the solution in one project and it can be reused in other projects
- Cons
- The necessity to duplicate the interface
- Code redundancy
Localization of the app
Today’s standard is that apps are offered in various language mutations in order to attract as wide a spectrum of users as possible. And Flutter is one of them, offering several options on how to get the required properties. Using the intl package for the support of localization is one of the possible options. The package adds the support for localization to any project written in Dart. It establishes a special construction for getting the string’s definitions in the project that ensures the usage of a correct language mutation. Based on this construction and using a special tool, files with corresponding strings are generated for each language mutation that supplement the translation. These are then added to the final app. The second option we’ll present is defining the translation directly in the source code.
We’ll add a new dependency to the pubspec.yaml file that will provide the support for localization.
dependencies:
  flutter_localizations:
    sdk: flutter
  ...
In order to add support for any language to our app, we need to add two classes, as shown in the example below. The _EventsLocalizationsDelegate class is for the loading and storing of the EventsLocalizations object with the relevant, supported localization. Both classes are quite usual and they’ll be similar in every project. The only thing that changes is the values defined in the _localizedValues attribute. It’s a master map where the keys of the first map are marks according to the IANA register.
enum StringId {
  appTitle,
  homeScreenTitle,
  ...
}

class EventsLocalizations {
  static const LocalizationsDelegate<EventsLocalizations> delegate = const _EventsLocalizationsDelegate();

  static const Map<String, Map<StringId, String>> _localizedValues = {
    'en': {
      StringId.appTitle: 'Eman\'s events',
      StringId.homeScreenTitle: 'Events',
      ...
    },
    'cs': {
      StringId.appTitle: 'Eman\'s events',
      StringId.homeScreenTitle: 'Akce',
      ...
    },
    ...
  };

  static final Iterable<Locale> supportedLocales = _localizedValues.keys.map((languageCode) => Locale(languageCode));

  static EventsLocalizations of(BuildContext context) => Localizations.of<EventsLocalizations>(context, EventsLocalizations);

  final Locale _locale;

  EventsLocalizations(this._locale);

  String get appTitle => _localizedValues[_locale.languageCode][StringId.appTitle];
  String get homeScreenTitle => _localizedValues[_locale.languageCode][StringId.homeScreenTitle];
  // or
  String getString(StringId stringId) => _localizedValues[_locale.languageCode][stringId];
}

class _EventsLocalizationsDelegate extends LocalizationsDelegate<EventsLocalizations> {
  const _EventsLocalizationsDelegate();

  @override
  bool isSupported(Locale locale) => EventsLocalizations._localizedValues.containsKey(locale.languageCode);

  @override
  Future<EventsLocalizations> load(Locale locale) => SynchronousFuture<EventsLocalizations>(EventsLocalizations(locale));

  @override
  bool shouldReload(LocalizationsDelegate<EventsLocalizations> old) => false;
}
The last thing to do is to specify which language mutations are supported by the app (the supportedLocales parameter of the app’s widget) and register the delegates for all components that’ll be responsible for the correct localization (the localizationsDelegates field of the app’s widget).
class EventsApp extends StatelessWidget {
  @override
  Widget build(BuildContext context) {
    return MaterialApp(
      localizationsDelegates: [
        EventsLocalizations.delegate,
        GlobalMaterialLocalizations.delegate,
        GlobalWidgetsLocalizations.delegate,
      ],
      supportedLocales: EventsLocalizations.supportedLocales,
      ...
    );
  }
}
Then to get a localized string we’ll use one of the following methods based on what localization class interface we selected.
EventsLocalizations.of(context).appTitle;
// or
EventsLocalizations.of(context).getString(StringId.appTitle);
Note: The current Material Components version does not support Czech, it introduces an error while rendering widgets.
Creating layouts
As previously stated, the layout creation is simply a puzzle. You just put together simple widgets, thus creating a widget that looks and does what was expected of it from the beginning. The following example shows the creation of ListView and its elements and we’ll also take a look at the usage of a few basic layouts. If you’d like to create more complex layouts, take a look at the Flutter webpage for some ideas to get you started.
class EventListState extends State<EventList> {
  final _events = List<Event>();

  @override
  void initState() {
    super.initState();
    _events.addAll(generateWordPairs().take(10).map((pair) => Event(
          pair.asPascalCase,
          DateTime.now(),
          lorem.createParagraph(),
        )));
  }

  @override
  Widget build(BuildContext context) {
    return ListView.builder(
        padding: const EdgeInsets.all(20.0),
        itemCount: _events.length * 2,
        itemBuilder: (context, index) {
          if (index.isOdd) {
            return WidgetFactory().createDivider();
          } else {
            return _buildItem(_events[index ~/ 2]);
          }
        });
  }

  Widget _buildItem(Event event) {
    return GestureDetector(
      child: Container(
        decoration: BoxDecoration(color: Colors.transparent),
        child: Column(
          crossAxisAlignment: CrossAxisAlignment.start,
          children: [
            Container(
              padding: const EdgeInsets.only(bottom: 8.0),
              child: Text(
                event.name,
                style: TextStyle(fontSize: 20.0, color: Colors.black),
              ),
            ),
            Text(
              format.format(event.dateTime),
              style: TextStyle(
                fontSize: 16.0,
                color: Colors.grey[500],
              ),
            ),
          ],
        ),
      ),
      onTap: () => _itemClicked(event),
    );
  }
  ...
}
We’ll focus only on the _buildItem method that creates the layout of a single item of the list.
- GestureDetector – widget that allows the processing of all kinds of clicks, swipes etc.
- Container – widget responsible for determining a child’s location. It allows the definition of e.g. height, length, padding, or margin.
- Column – widget that aligns all its children into one column. The column’s width is determined by the widest child and all other children are centred.
You can picture the layout as a tree where every parent nod determines the behaviour or manner of the rendering of its children.
Cloud Firestore database
Cloud Firestore is a Document Store database; it’s the successor to the original Firebase real-time database. We’ll create a Firestore database for our example, with a collection named events containing several documents with the following structure:
name: "...",
date_time: "...",
description: "...",
We won’t go into details of the actual Cloud Firestore database creation and its addition to the project. For more details on this process, please have a look at this guide from Google. After the actual configuration, adding it to the project is a piece of cake. In the previous example, the initState method created a list of events containing random dates that we will now switch for dates from the database. We’ll get the events collection from an instance of the database and all documents that it contains will be mapped by the Event model class. In the following example we regard the events collection as a data stream and, using the listen method, we react to any change of the data. Feel free to try for yourself how the app reacts to you changing the data in the database.
class EventListState extends State<EventList> {
  ...
  @override
  void initState() {
    Firestore.instance
        .collection('events')
        .orderBy('date_time')
        .snapshots()
        .listen((event) => setState(() {
              _events.clear();
              _events.addAll(event.documents.map((snapshot) => Event(
                    snapshot.data['name'],
                    DateTime.parse('${snapshot.data['date_time']}z'),
                    snapshot.data['description'],
                  )));
            }));
  ...
}
Conclusion
In this article we presented how to tackle the issue of keeping the style for a given platform, and we created a support for a multi-language app. Then we created a simple layout and connected the app to the Firestore database. You can find the whole project that we have been very secretly creating here, one part at a time, at our GitHub, where you can also see that the project’s history follows this article.