
In the third article of the Anko library series we are going to improve the design of our demo application so it looks a bit better. We will also get to know other extension functions of Anko, e.g. how to set the app layout to portrait or landscape mode.
Kotlin – Introduction to Anko for Android (3/4)

In the first article we learned how to create the UI which we defined as separate components (AnkoComponent). We also tried to use them inside the Activity classes. In the previous article we added more logic into our demo application. Now it is time to go back a bit and focus on improving our UI.
List of all parts of the series:
1. Setting up the Android Studio, project, and creating your first view in Anko
2. Buttons, Toasts, Alert Dialogs, Intents, UI & Background Threads
3. View Enhancements
4. Fragments & RecyclerView
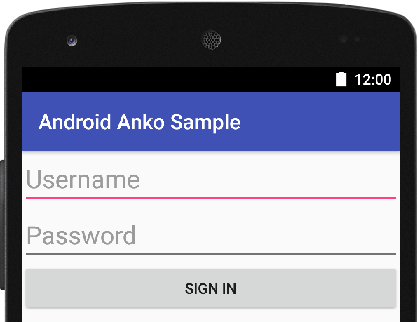
Let’s start by adding the padding into the root UI element (vertical layout) in the SignInView component:
SignInView.kt – without padding
// SignInView.createView
verticalLayout {
    padding = dip(20)
    ...
}
SignInView.kt – padding added
DSL written above is equal to XML definition:
<LinearLayout
    android:padding="20dip"
    ...
 />
Notice that the font size is set as the same for both components in the SignInView component. The textSize is equal to 24f.
val username = editText {
  ...
  textSize = 24f
}

val password = editText {
  ...
  textSize = 24f
}
Anko has another useful extension function; applying parameters into the view recursively, meaning applyRecursively{}. It allows us to set the TextSize parameter recursively to all UI components, e.g. to the EditText type:
verticalLayout {
  padding = dip(20)
  ...
  val username = editText {
    id = R.id.usernameEditText
    hintResource = R.string.sign_in_username
  }.lparams(width = matchParent, height = wrapContent)

  val password = editText {
    id = R.id.passwordEditText
    hintResource = R.string.signIn_password
  }.lparams(width = matchParent, height = wrapContent)

  button {...}.lparams(width = matchParent, height = wrapContent)
}.applyRecursively { view ->
    when (view) {
        is EditText -> view.textSize = 24f
    }
}
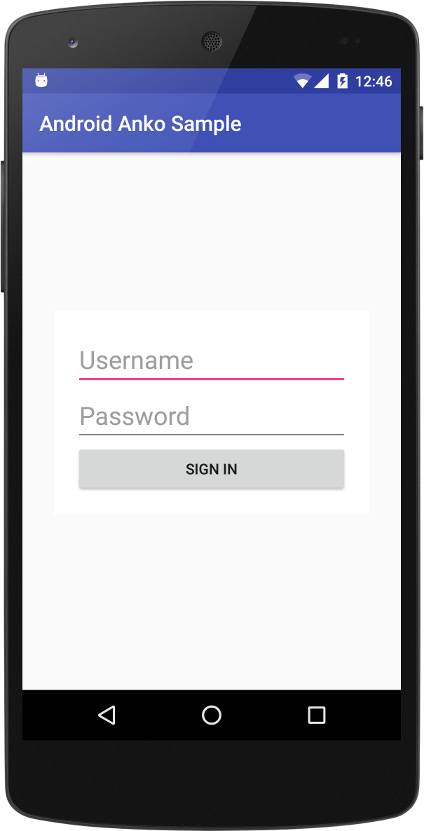
In the next step we will add the scroll component to SignInView and align the form to center. After completing these steps, the UI will look like this:
I will not describe every little change I made step-by-step, but we will discuss the most important ones. Please copy the following code, use it in your demo app, and try running the application.
ackage com.example.android.anko.sample.sign_in

import android.os.Build
import android.support.v4.content.ContextCompat
import android.view.Gravity
import android.view.ViewGroup
import android.widget.EditText
import android.widget.LinearLayout
import com.example.android.anko.sample.R
import org.jetbrains.anko.*

/**
 * @author vsouhrada
 * @since 0.1.0
 * @see[AnkoComponent]
 * @see[SignInActivity]
 */
class SingInView : AnkoComponent<SignInActivity> {

    private lateinit var ankoContext: AnkoContext<SignInActivity>

    override fun createView(ui: AnkoContext<SignInActivity>) = with(ui) {
        ankoContext = ui

        verticalLayout {
            this.gravity = Gravity.CENTER

            scrollView {

                verticalLayout {

                    verticalLayout {
                        id = R.id.formLogin
                        gravity = Gravity.CENTER
                        padding = dip(20)

                        lparams(width = dip(300), height = matchParent) {
                            this.gravity = Gravity.CENTER
                            // API >= 16
                            doFromSdk(version = Build.VERSION_CODES.JELLY_BEAN) {
                                background = ContextCompat.getDrawable(ctx, android.R.color.white)
                            }
                            clipToPadding = false
                            bottomMargin = dip(16)
                        }

                        val username = editText {
                            id = R.id.usernameEditText
                            hintResource = R.string.sign_in_username

                        }.lparams(width = matchParent, height = wrapContent)

                        val password = editText {
                            id = R.id.passwordEditText
                            hintResource = R.string.signIn_password

                        }.lparams(width = matchParent, height = wrapContent)

                        button {
                            id = R.id.signIn_button
                            textResource = R.string.signIn_button

                            onClick {
                                handleOnSignInButtonPressed(username = username.text.toString(), password = password.text.toString())
                            }

                        }.lparams(width = matchParent, height = wrapContent)

                    }.applyRecursively { view ->
                        when (view) {
                            is EditText -> view.textSize = 24f
                        }
                    }

                }.lparams(width = matchParent, height = matchParent)

            }.lparams(width = matchParent, height = wrapContent)

        }
    }

    private fun handleOnSignInButtonPressed(username: String, password: String) {
        with(ankoContext) {
            if (username.isBlank() or password.isBlank()) {
                alert(title = R.string.sigIn_alert_invalid_user_title,
                        message = R.string.sigIn_alert_invalid_user_message) {

                    positiveButton(R.string.dialog_button_close) {}
                }.show()
            } else {
                owner.authorizeUser(username, password)
            }
        }
    }

    fun showAccessDeniedAlertDialog() {
        with(ankoContext) {
            alert(title = R.string.sigIn_alert_access_denied_title,
                    message = R.string.sigIn_alert_access_denied_msg) {

                positiveButton(R.string.dialog_button_close) {}
            }.show()
        }
    }

}
Line 26: we added new a gravity parameter aligned to center
Line 28: we added a scrollView component including verticalLayout wrapping Sign in form
Line 32: here we can see our original verticalLayout to which we added the gravity parameter with center alignment
Line 37: 300dp setting for form size
Note: You may wonder why we have a definition of lparams on line number 37 within the verticalLayout component instead of after the layout termination as is usually recommended. That is because the layout length setting in 0.9 works only with the definition I provided you. Additionally, it will work only if we move the code to the apply function:
...
verticalLayout {
....
}.apply {
    lparams(width = dip(300), height = matchParent) {
        this.gravity = Gravity.CENTER
        // API >= 16
        doFromSdk(version = Build.VERSION_CODES.JELLY_BEAN) {
            background = ContextCompat.getDrawable(
                   ctx, android.R.color.white)
        }
        clipToPadding = false
        bottomMargin = dip(16)
    }
}
Let’s go back to the original code without using the apply function. At line 40, you may notice the following code:
// API >= 16
doFromSdk(version = Build.VERSION_CODES.JELLY_BEAN) {
    background = ContextCompat.getDrawable(
           ctx,android.R.color.white)
}
Using the View#setBackground requires API ≥ 16. Anko contains several functions for these purposes and for different portrait and landscape settings:
// Code inside for this block code is from original Anko //Documentation
configuration(screenSize = ScreenSize.LARGE, orientation = Orientation.LANDSCAPE) {
    /*
      This code will be only executed
      if the screen is large and its orientation is landscape
    */
}
So in our case, when we do not distinguish the rotation of the device, we may also use the following entry:
configuration(fromSdk = Build.VERSION_CODES.JELLY_BEAN) {
    background = ContextCompat.getDrawable(
           ctx, android.R.color.white)
}
Summary
In this article we learnt how to add more parameters such as padding and gravity to the UI components and we also added the component scroll view. We also tried applying those parameters recursively (e.g. textSize).
Finally, we now understand the way Anko library handles portrait/landscape mode and how to distinguish the Android API applicable for the code.
The next article describes the work with Fragments. You’ll see that Anko contains many improvements for writing fragments.